Rubrics & Learning Outcomes
Rubrics & Learning Outcomes
Rubrics in Rumi let you define exactly what you're looking for in an assignment, assess student work against those criteria, and give targeted feedback that students can see alongside their writing. Once you've assessed a few assignments, Rumi also builds a Learning Outcomes dashboard from that same rubric data.
In this article, we’ll look at how to:
- Build a rubric and set its performance levels
- Assign points to each criterion and level
- Assess student work, select levels, and leave comments
- Control when students see rubric feedback
- Understand what students and peer reviewers see
- Use AI feedback — and understand who can generate it
- Use the Learning Outcomes dashboard to understand class performance
Setting up your rubric
Rubrics live on the Rubric and Outcomes page for each assignment, under the Rubric Management tab. The Learning Outcomes tab beside it holds the class dashboard, covered at the end of this article.
Creating the rubric
The Rubric Generator offers four ways to start:
- Generate with AI – Rumi drafts a full rubric for your assignment
- Build Manually – create criteria and levels yourself
- Import Rubric – bring in an existing rubric
- Canvas Sync – pull a rubric from Canvas (for Canvas LMS users)
Setting the level scale
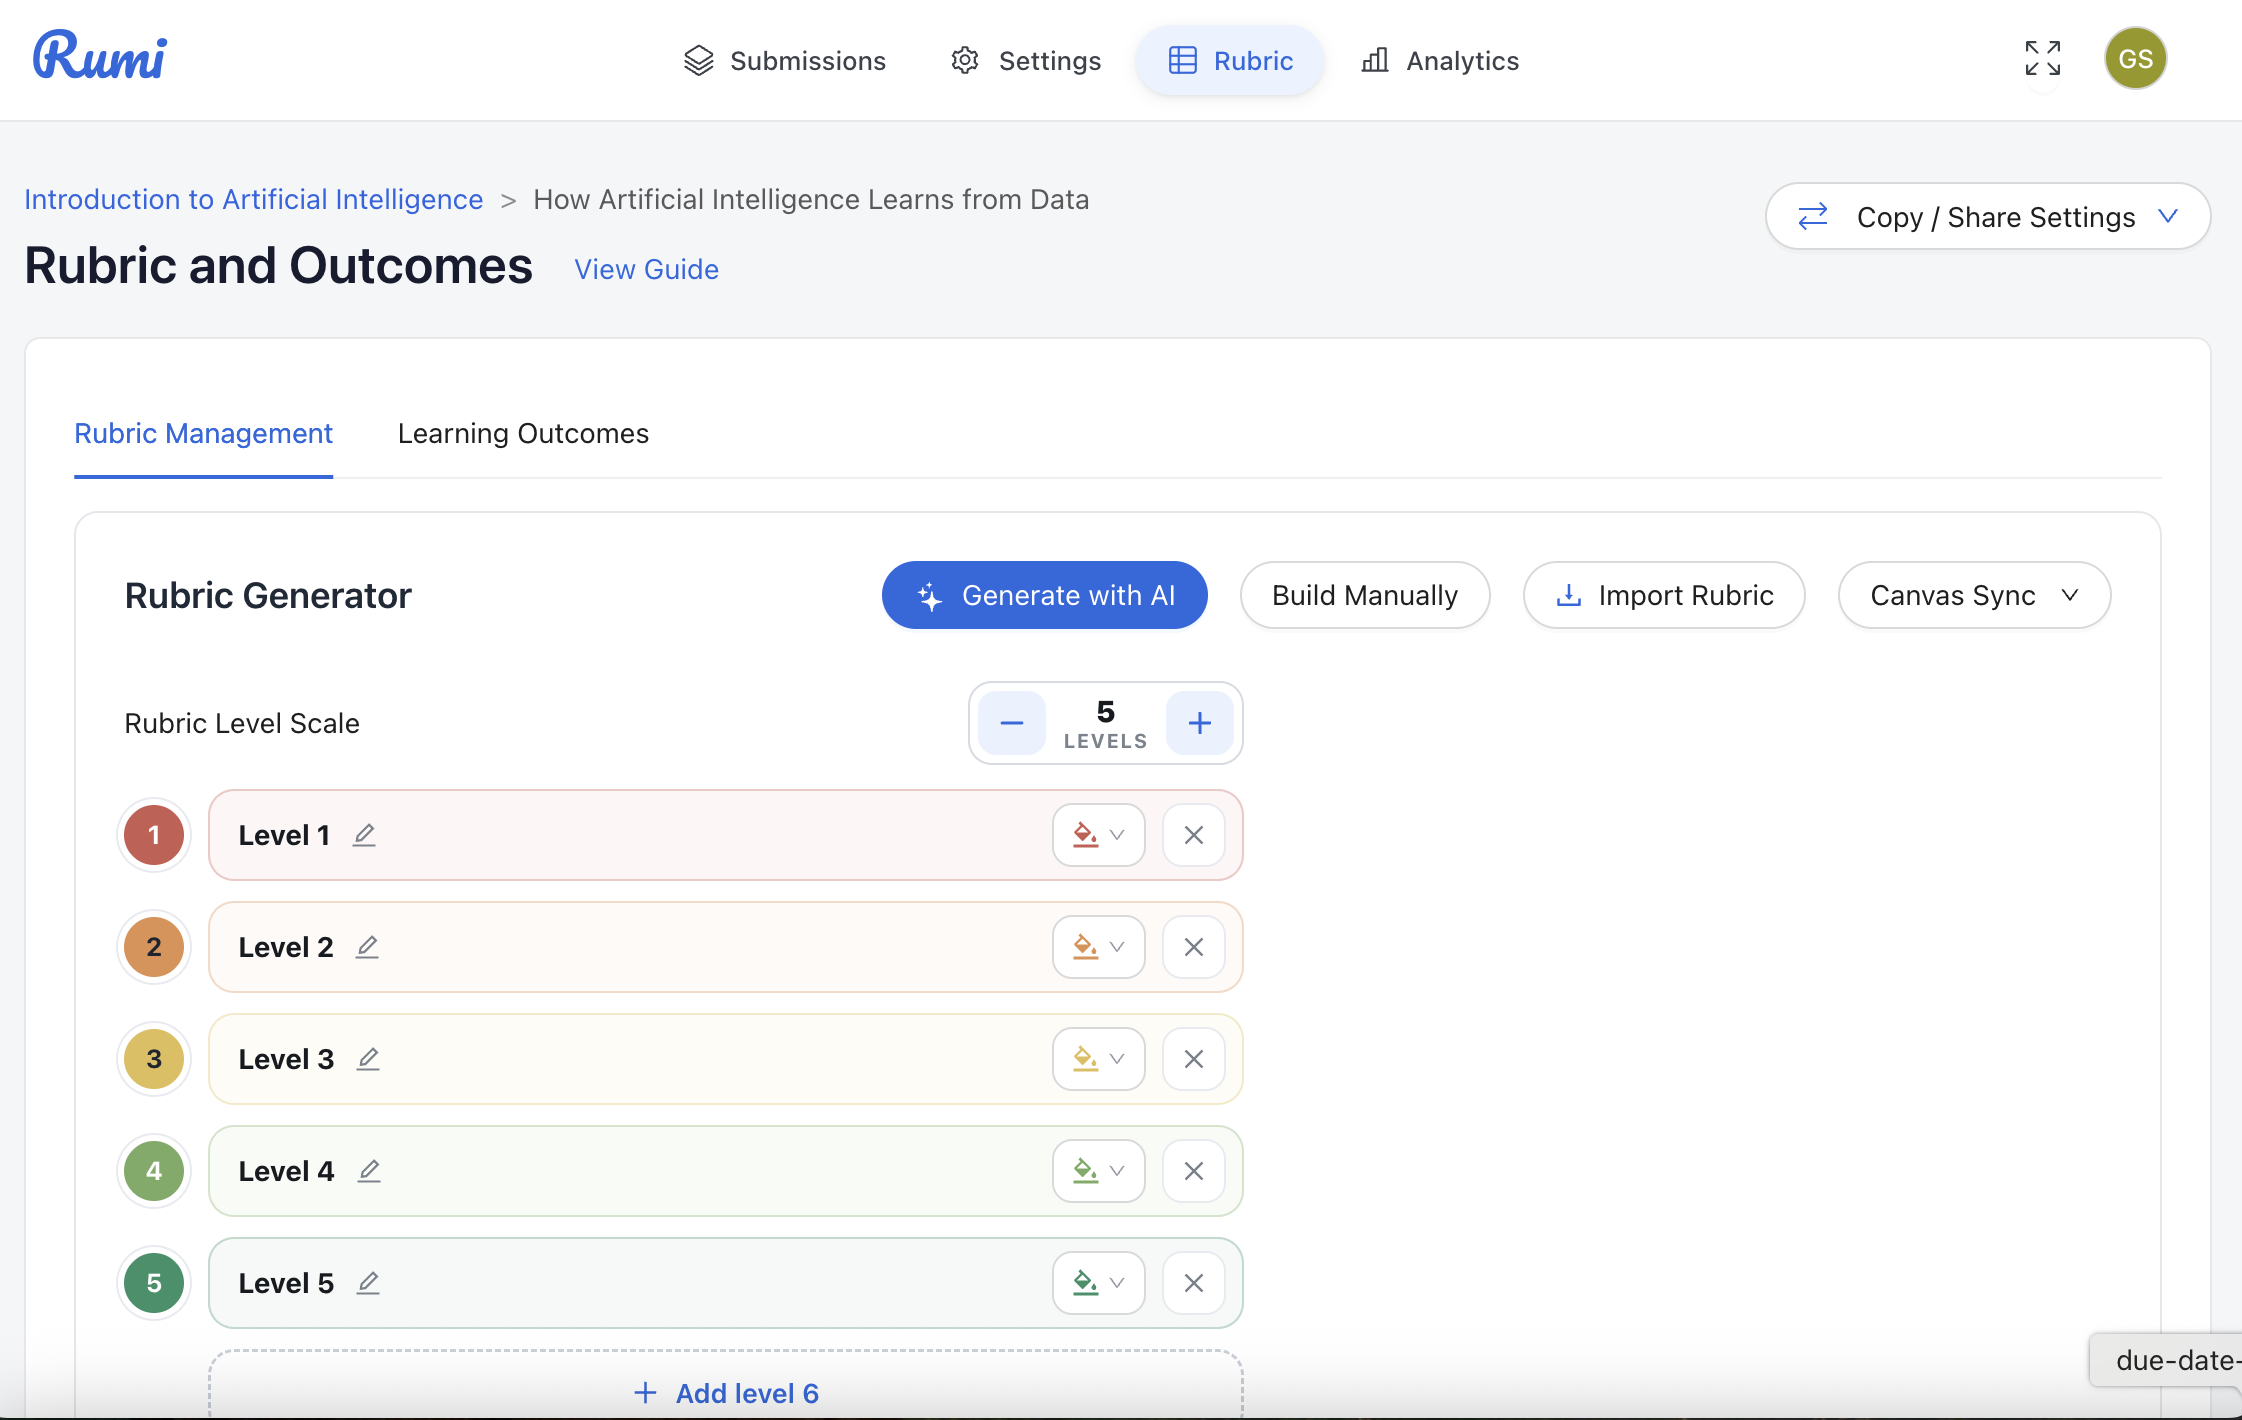
Before generating, set the Rubric Level Scale — the number of performance levels your rubric uses. Use the – and + controls beside the level count to change it, then for each level you can rename it with the pencil icon, change its color with the fill dropdown, or remove it with the X. The button at the bottom adds another level and is labelled with the number it will create, for example Add level 6.
New levels are named Level 1, Level 2 and so on, and come with a default color scale running from red at the lowest level to green at the highest. Rename them to match your own language — Developing, Proficient, Exemplary — and the names carry through to what students see.
You can also change the level count later from the levels stepper above the rubric table.
Assigning points
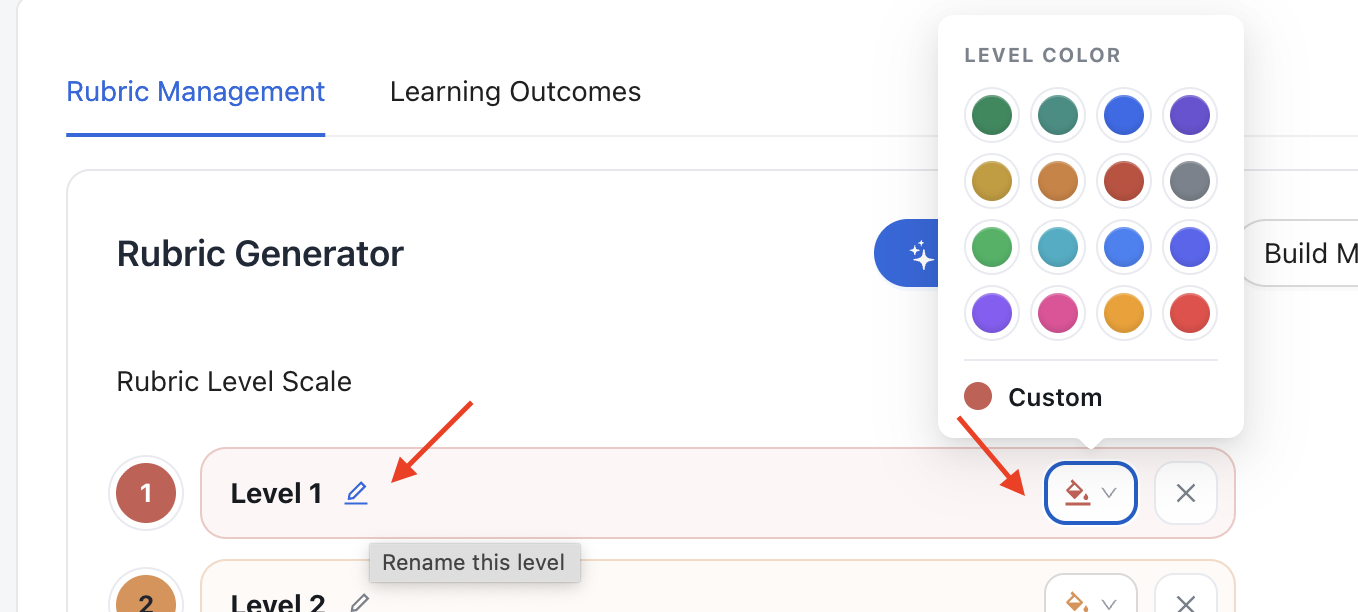
Turn the Points toggle ON to attach a point value to every level of every criterion. Click the pencil on any pts chip to edit that level's value. Each criterion shows its own maximum, and the rubric header shows the total pts for the whole assignment.
Leave Points off if you want a rubric with performance levels but no numeric scoring. Everything else — level selection, comments, the student panel, the Learning Outcomes dashboard — works the same either way.
Use Add Criteria to add rows, the pencil to rename a criterion, Undo to step back, and Save Rubric to save your changes.
Opening the rubric from an assignment
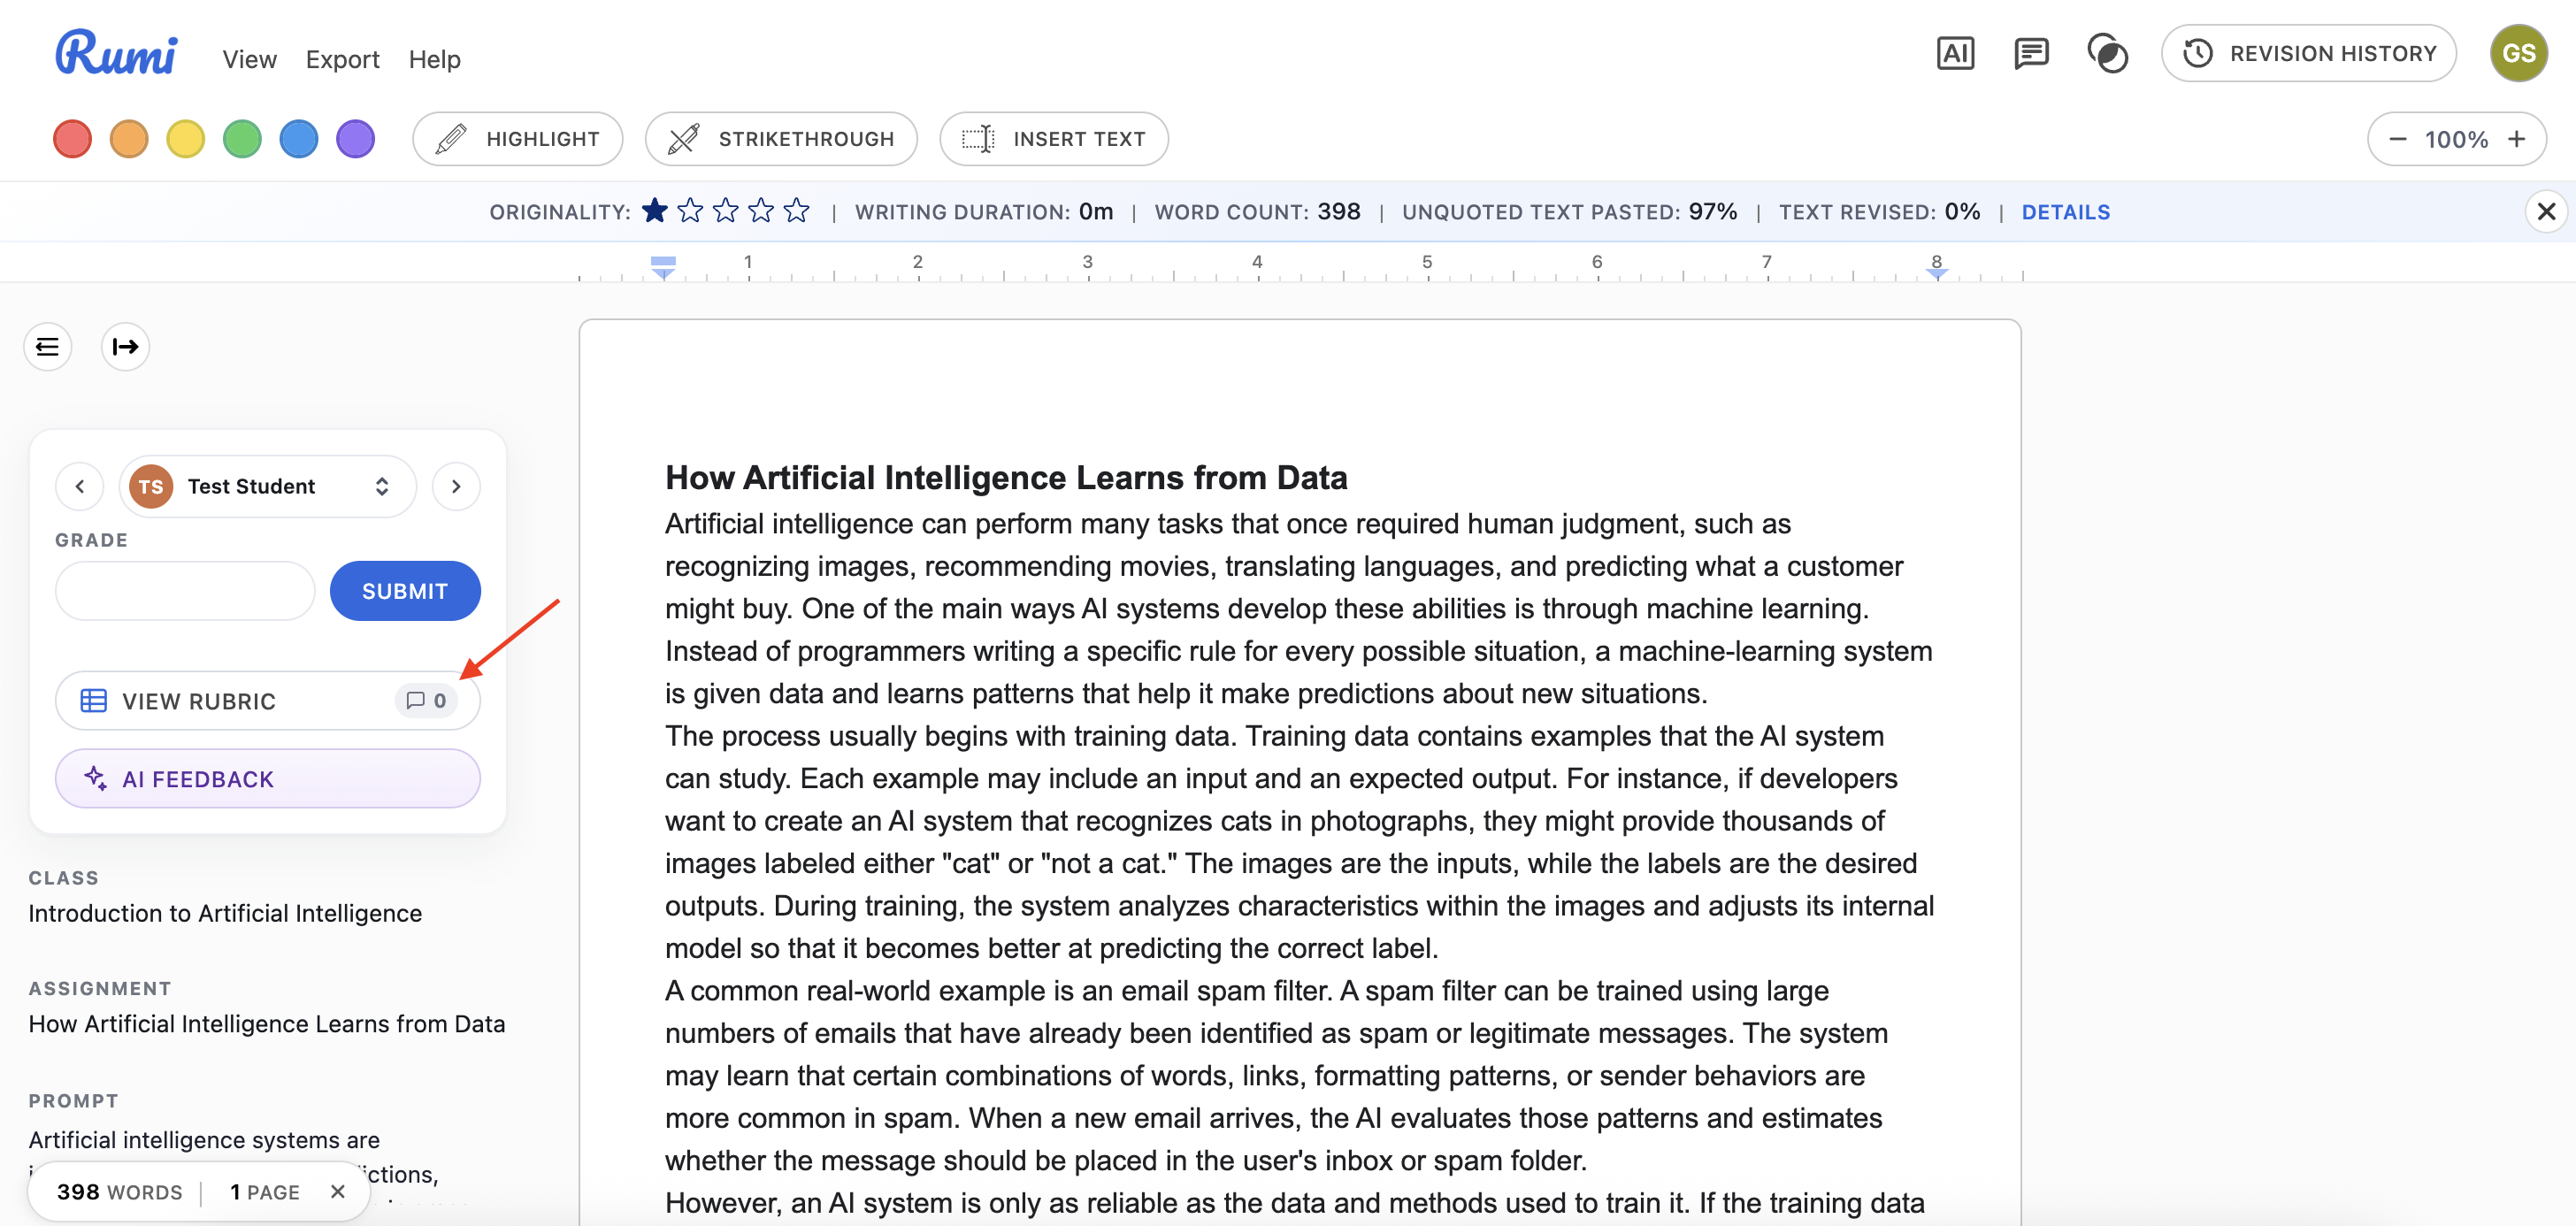
On the assignment page, the left panel has two buttons: View Rubric opens the rubric panel beside the writing area, and AI Feedback opens the AI tab directly.
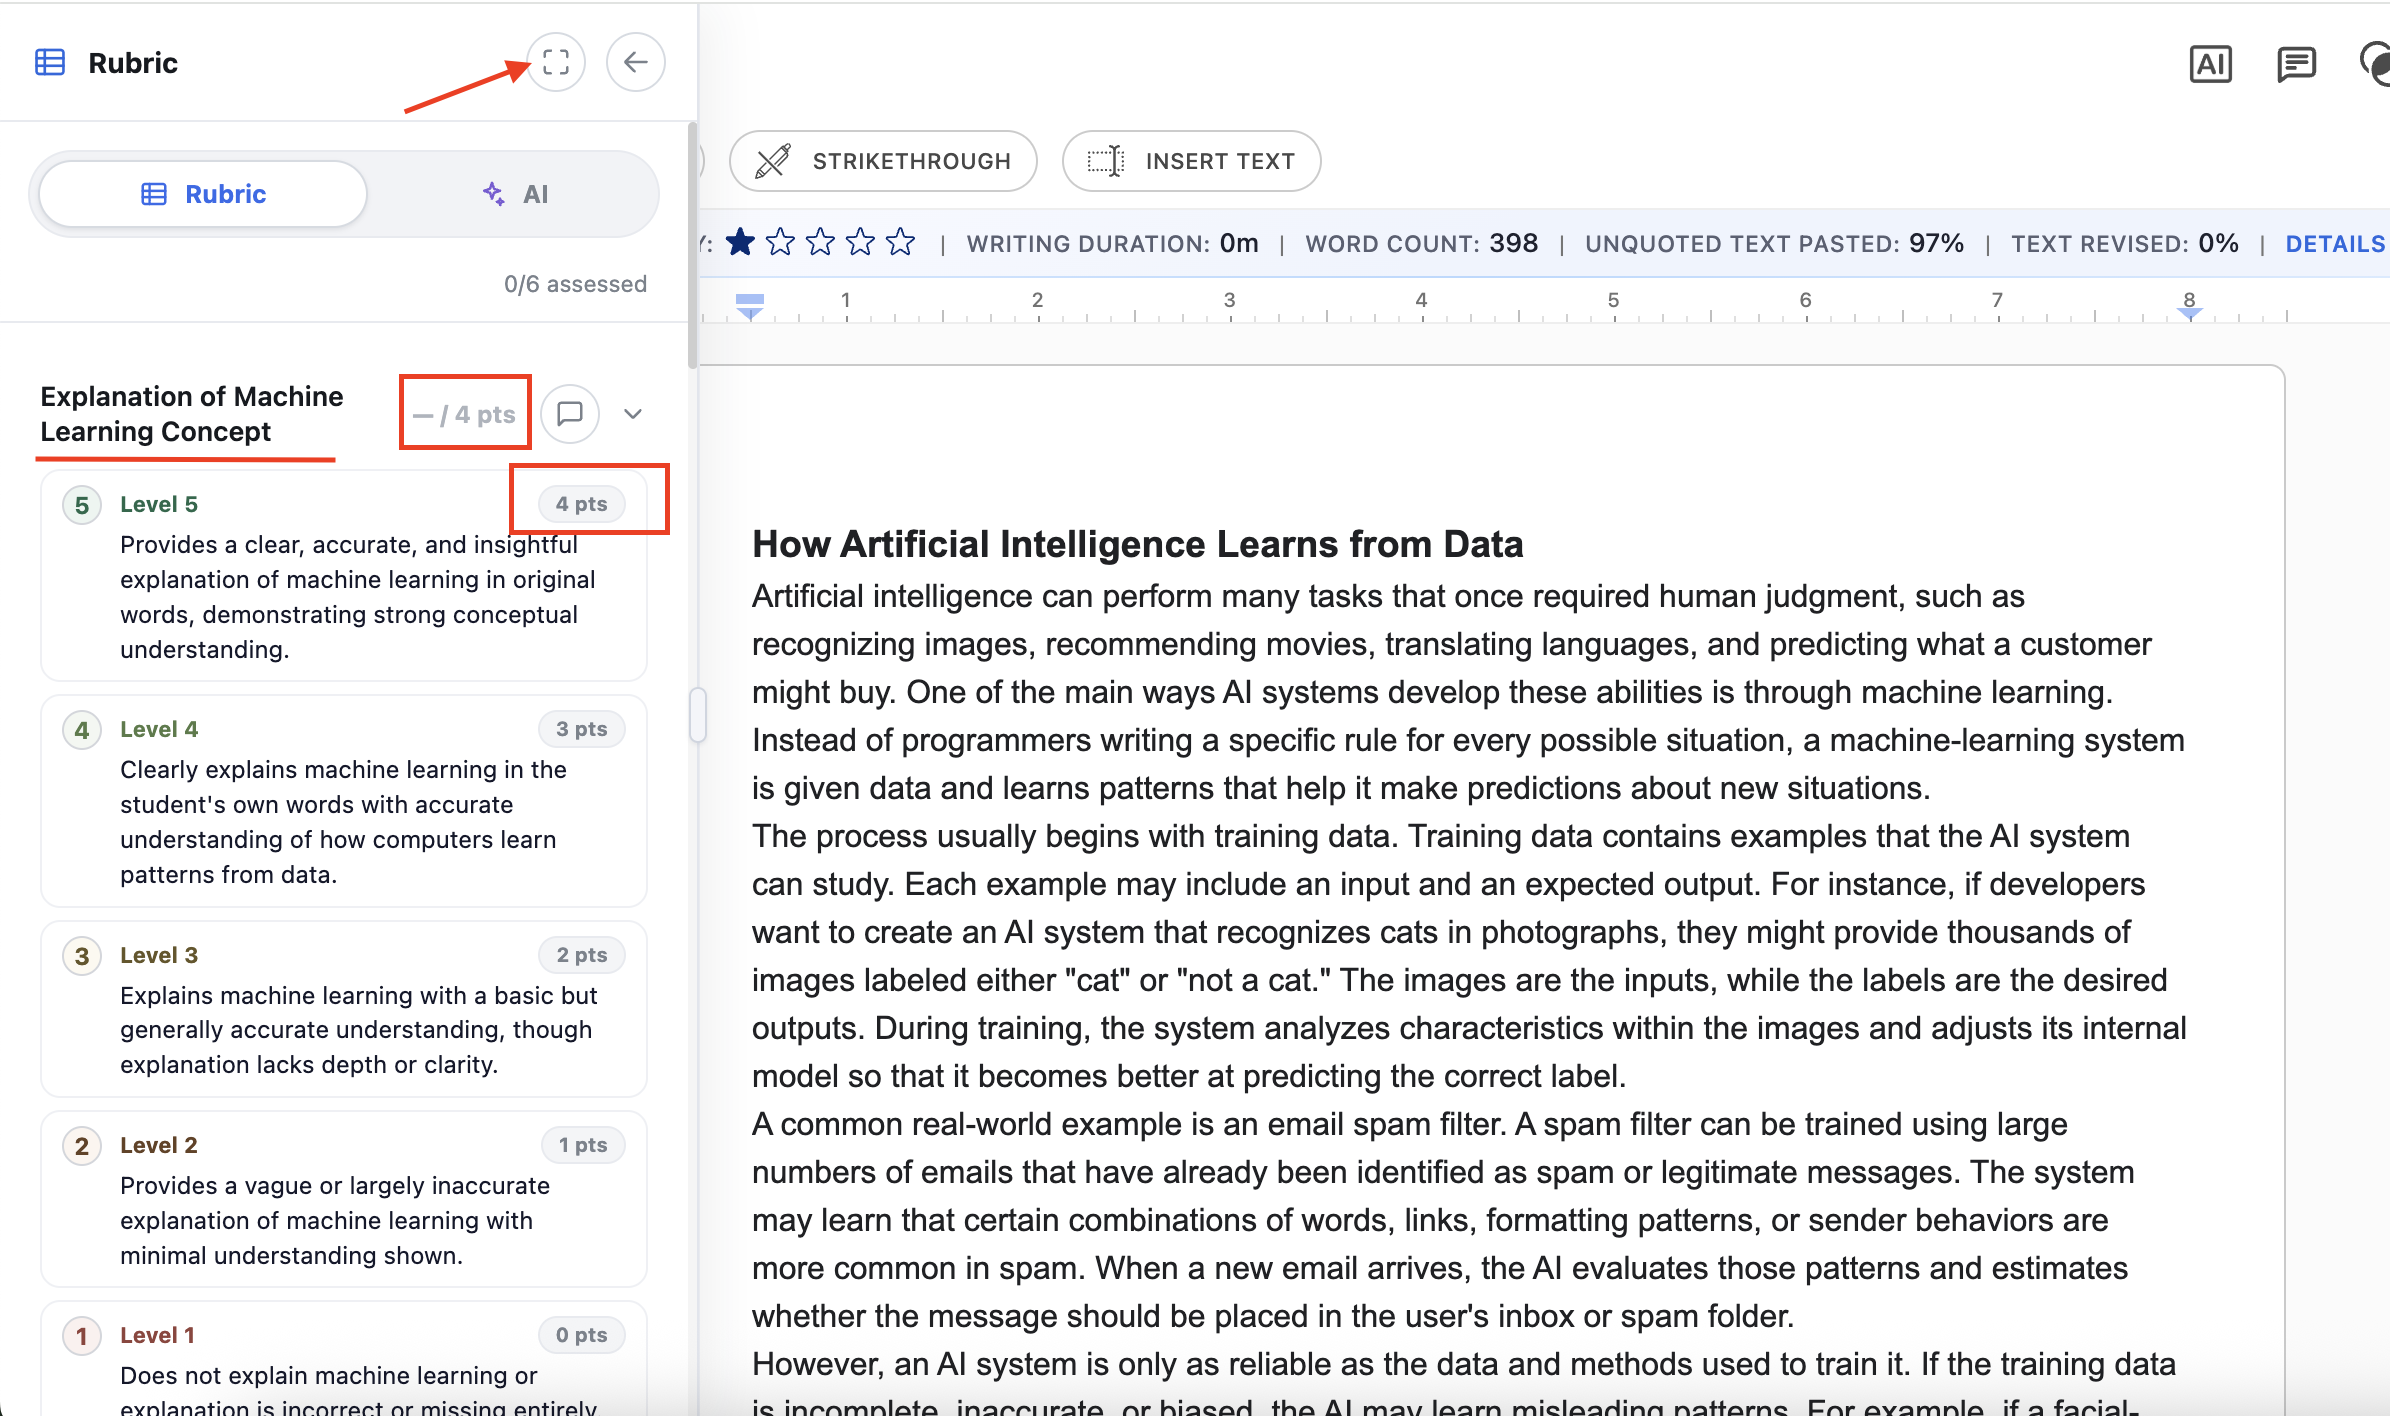
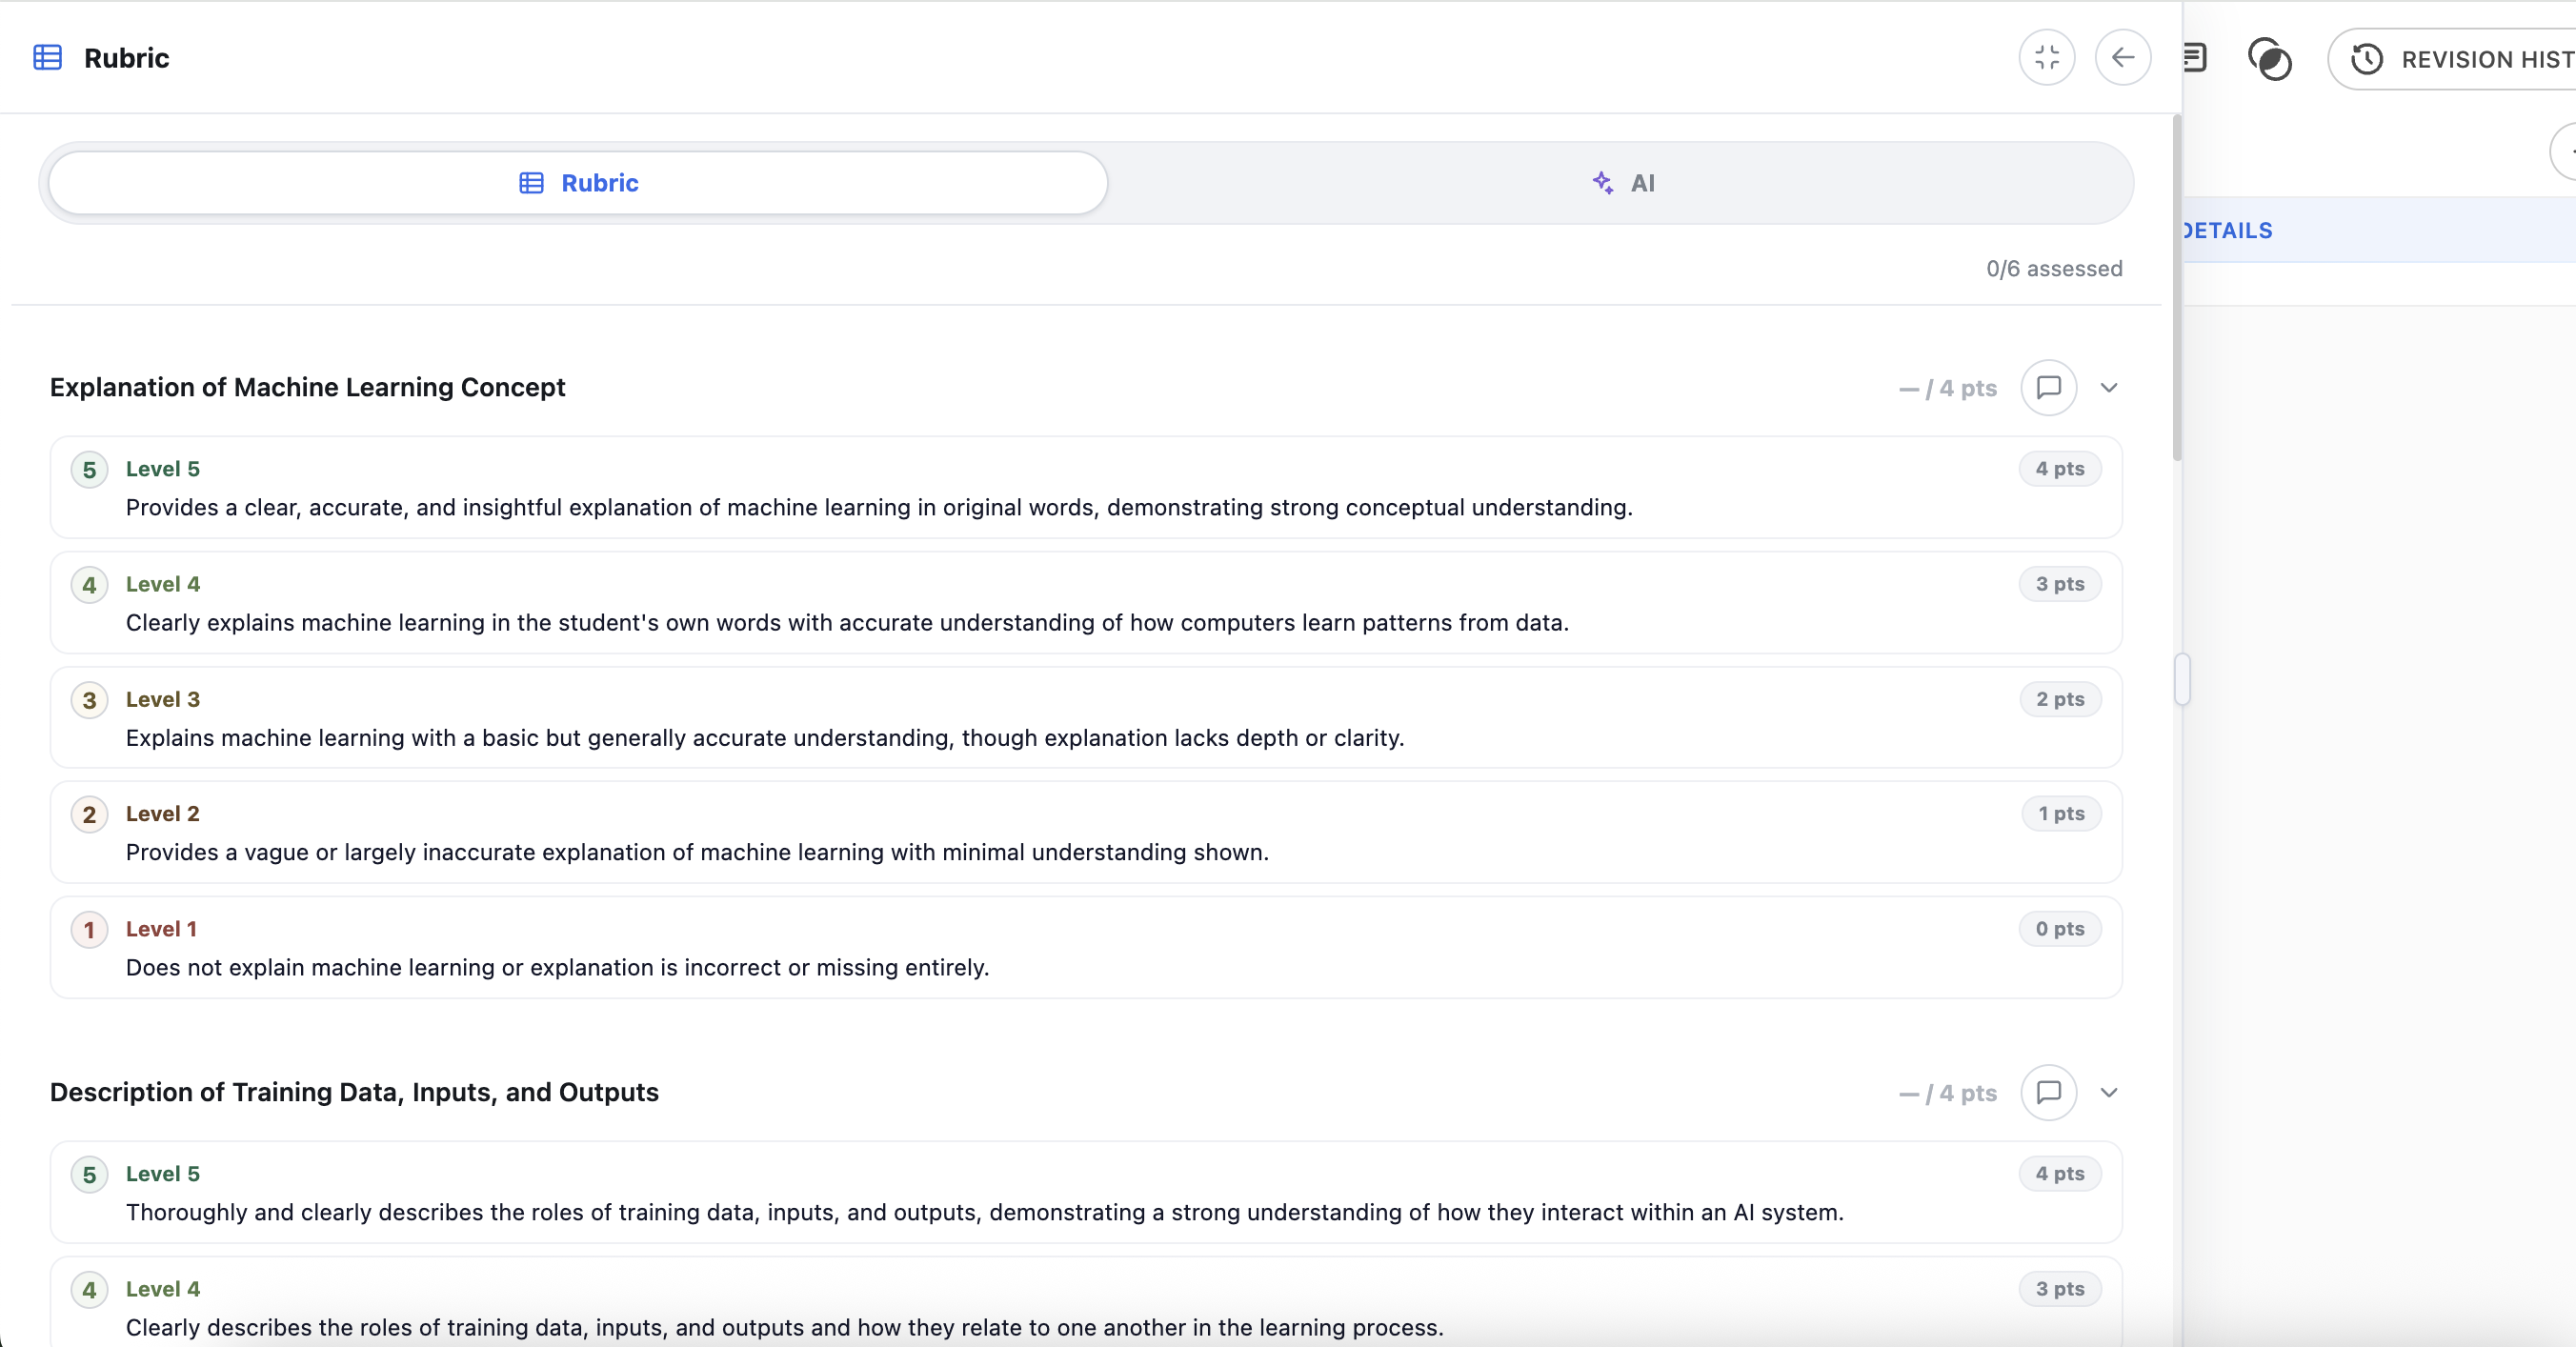
The rubric panel opens side-by-side with the document so the rubric stays visible while you read or write. Click the expand icon in the panel header to widen it to full page for easier reading, and collapse it again to return to the document. The panel header shows how many criteria have been assessed so far — for example, 0/4 assessed.
Assessing student work with the rubric
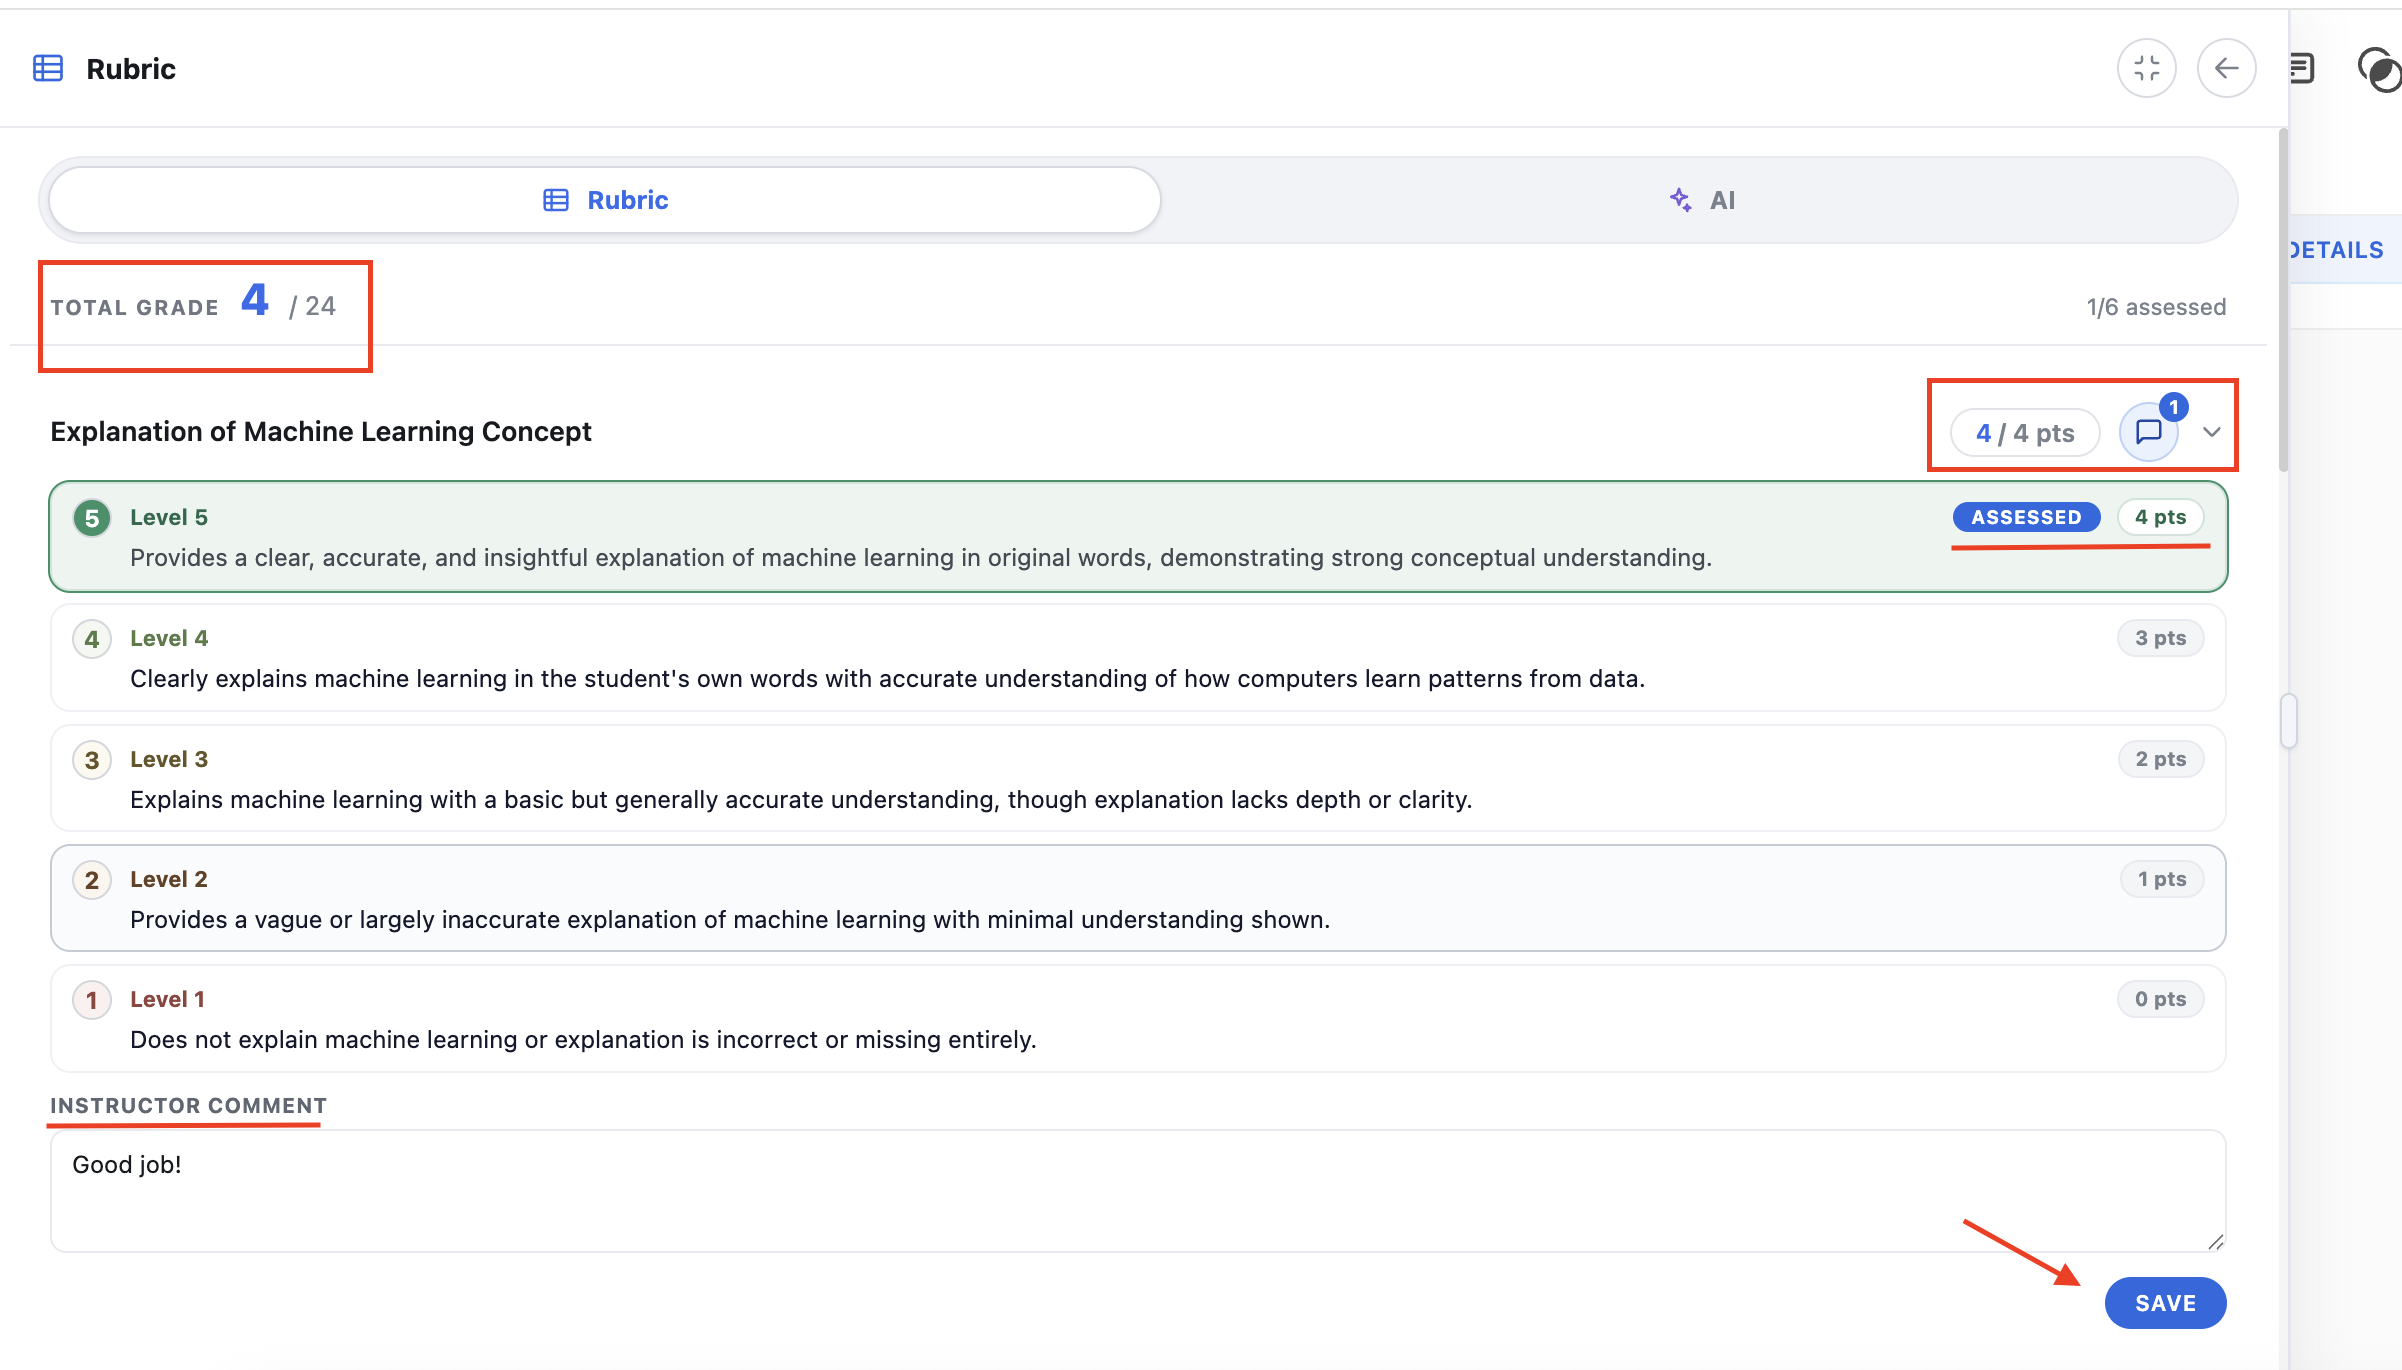
Open a student's submission and open the rubric panel beside it. For each criterion, select a level by clicking its card. The selected card is highlighted and marked Assessed, and the criterion's score updates — for example, 10 / 10 pts. To change your mind, click a different level; the new selection replaces the old one.
As you work, the panel header keeps a running Total Grade — for example, 10 / 19 — alongside the assessed count, so you can see how much of the rubric you've completed and where the student stands.
Adding comments to a criterion
Click the comment icon next to a criterion to open the Instructor Comment box, write your feedback, and click Save. A badge on the comment icon shows how many comments you've left on that criterion.
Level selections save automatically, but comments do not — click Save on each comment box before moving on.
Commenting on the document itself
Rubric levels and comments are separate from document feedback. You can still highlight passages and leave comments or annotations directly in the student's document. Document comments are visible to everyone with access to the document; rubric comments follow the visibility rules below.
Controlling when students see rubric feedback
You can decide whether students see rubric levels and comments immediately or only after you're ready to release them.
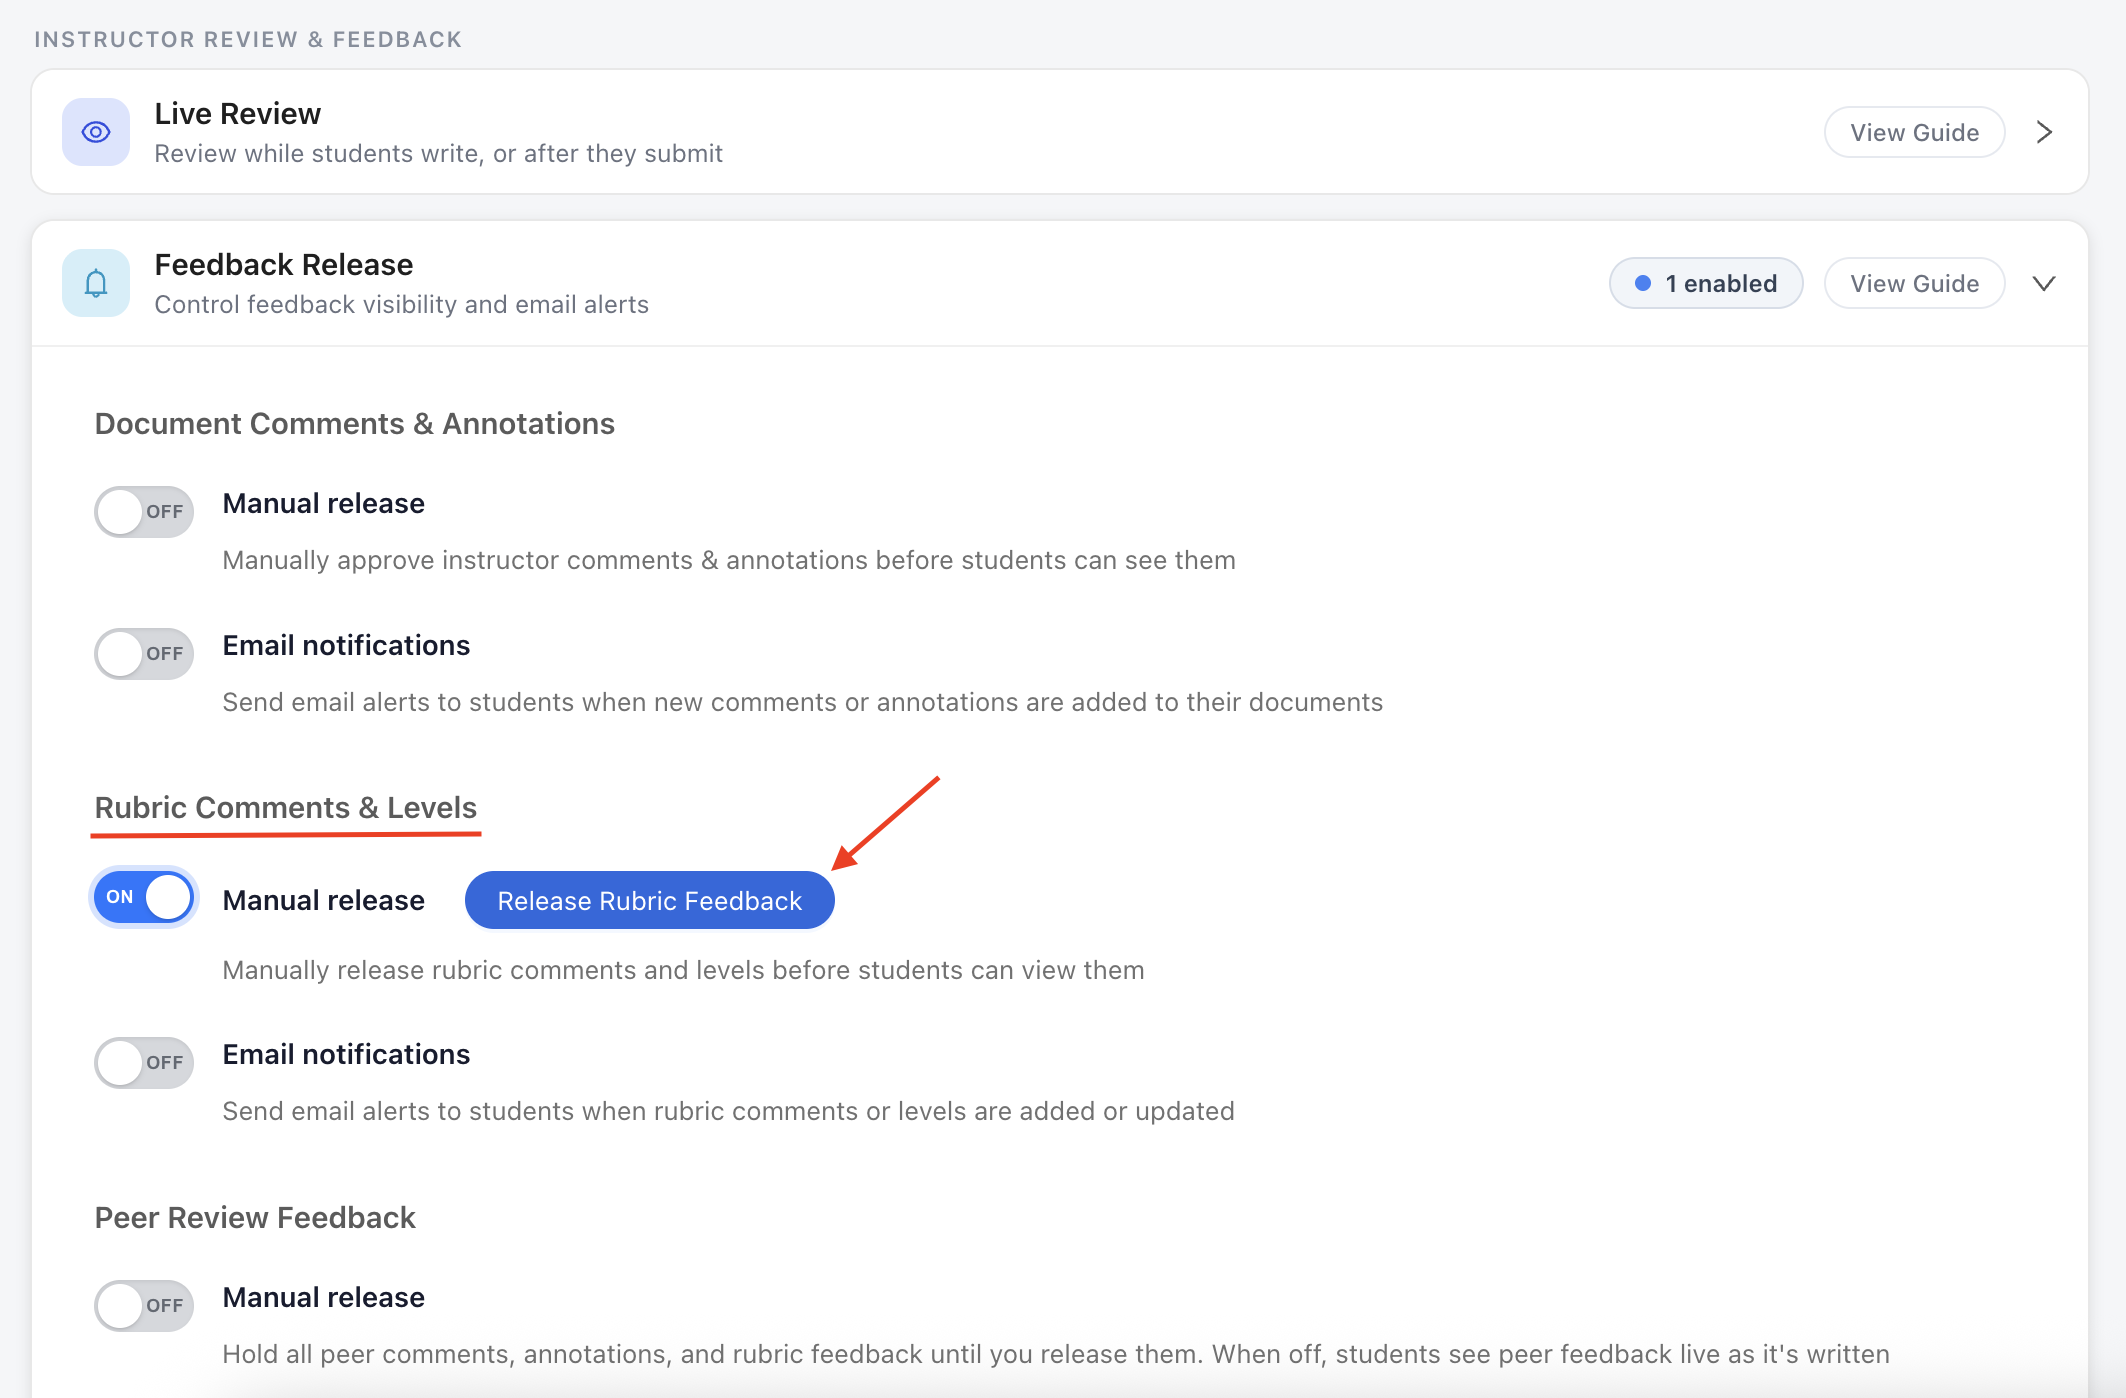
In the assignment settings, open Feedback Release and find the Rubric Comments & Levels section.
Manual release is a single toggle, and it is off by default. Left off, students see your rubric levels and comments as soon as you save them. Turn it on to hold everything back until you decide to publish.
With Manual release on, a Release Rubric Feedback button appears beside the toggle. Click it to make all levels and comments visible to students at once. The button then becomes Unrelease Rubric Feedback, so you can pull the feedback back, adjust levels or comments, and release again later.
Email notifications is a separate toggle in the same section. Turn it on to send students an email alert when rubric comments or levels are added or updated.
The same pair of toggles appears for Grades, Document Comments & Annotations, and — when peer review is enabled — Peer Review Feedback, and each works independently. Releasing rubric feedback does not release document comments or grades.
What students see
Badges on the View Rubric button
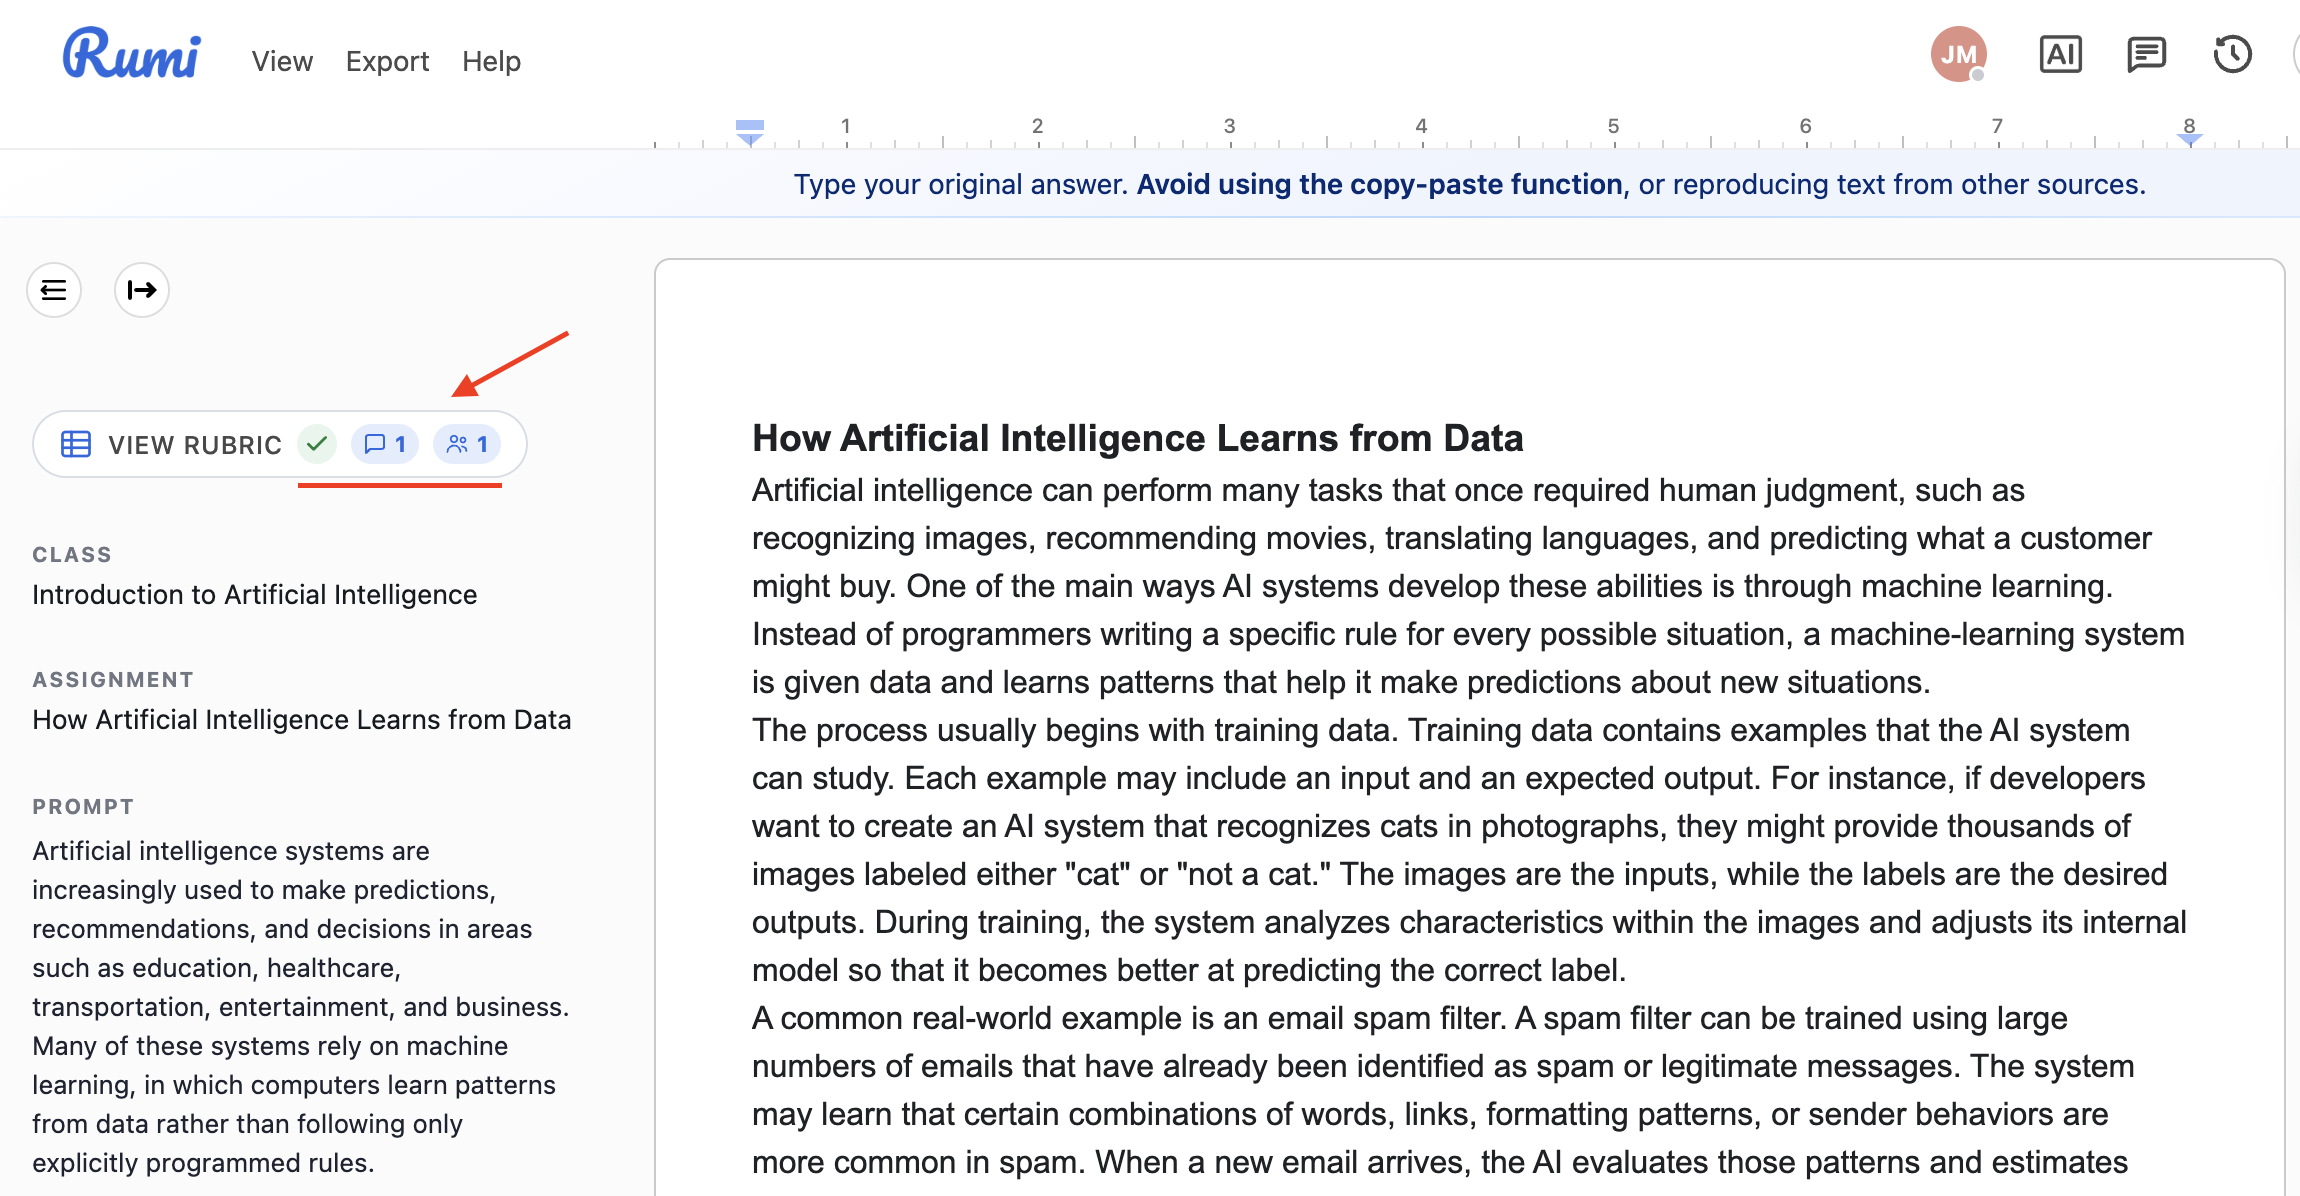
Before opening anything, students can tell at a glance what feedback is waiting. The View Rubric button carries up to two badges: a comment badge showing the number of instructor rubric comments, and a people badge showing the number of peer reviewers who have given rubric feedback.
Tabs inside the panel
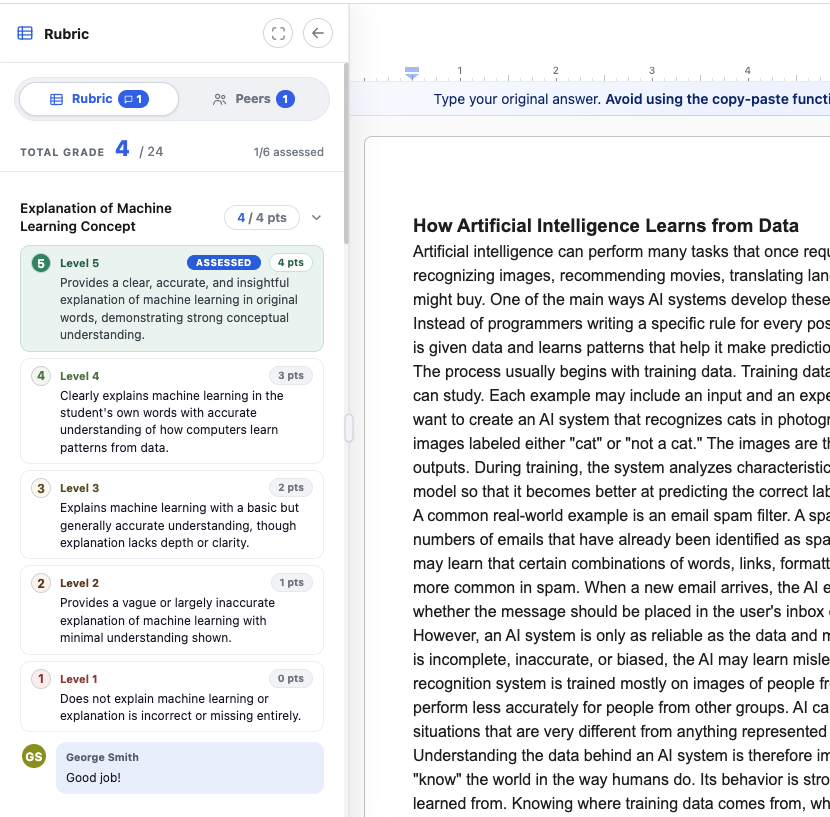
The student's rubric panel is organized into tabs, each carrying its own badge. The Rubric tab holds the rubric itself plus your assessment and comments. The Peers tab holds peer reviewers' ratings and comments, and only appears when peer review is enabled. The AI tab holds the student's own AI review of their essay.
On the Rubric tab, each criterion lists all of its performance levels with descriptions and point values, so students can check their work against expectations while drafting — before any feedback exists. Once feedback is available, either as you work or after you release it, the level you selected is highlighted and marked Assessed, with your comment shown beneath it alongside your name. A chip next to the criterion name shows the assessed level at a glance.
Students can open and close the rubric while they review your feedback, just as they could while working on the assignment.
Peer rubric feedback
If the assignment has peer review enabled, students also assess each other's work against the same rubric you built — selecting a level and writing a comment for each criterion, just as you do.
The author sees the result in the Peers tab: the average rating per criterion, how ratings were distributed across the levels, and each reviewer's name, level, and comment. Criteria no reviewer rated show as Not scored.
Rubric feedback is private. A peer reviewer sees only their own rubric ratings and comments — not yours, and not those of other reviewers. Only you and the essay's author see the complete picture. Document comments, by contrast, are visible to everyone.
Peer review is an Enterprise plan feature. For how reviewers are assigned and what the reviewing experience looks like step by step, see Real-time Peer Feedback.
AI feedback
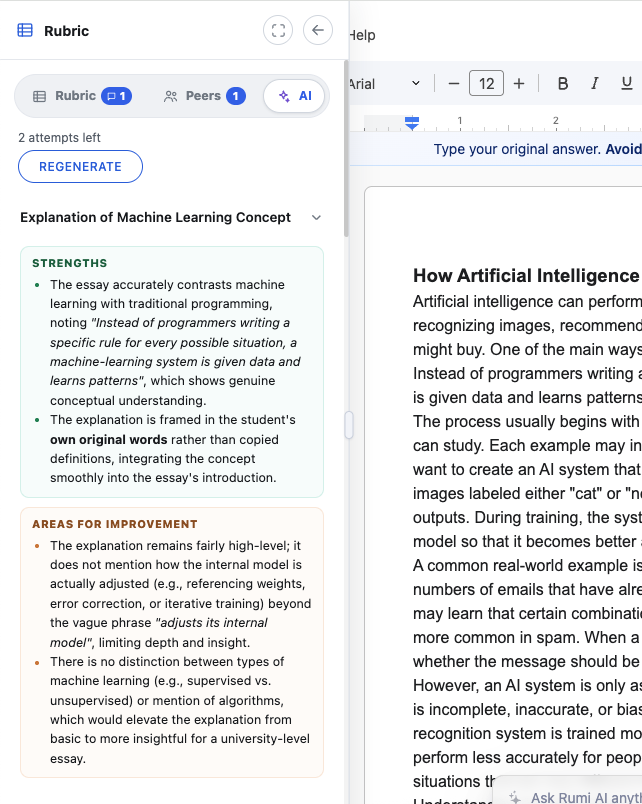
Rumi can generate feedback on an essay measured against your rubric. Open it from the AI tab in the rubric panel, or from the AI Feedback button in the left panel.
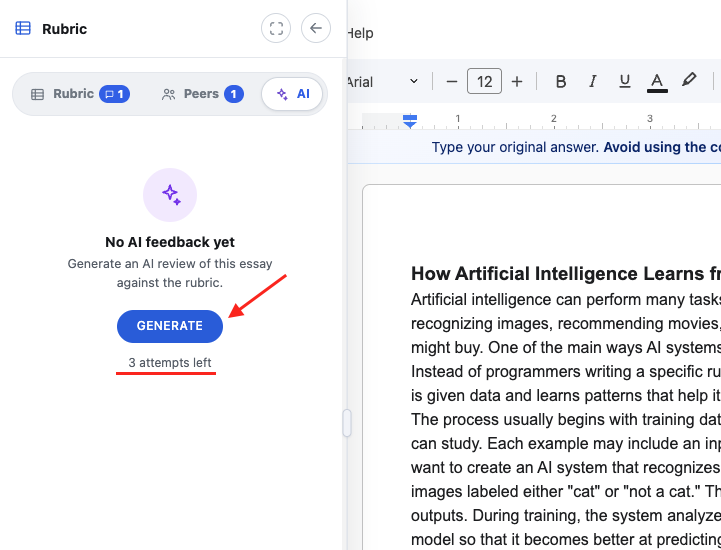
Click Generate to produce feedback. Rumi returns an Areas for Improvement breakdown for each rubric criterion, explaining specifically where the essay falls short. Each criterion can be expanded or collapsed, and after the first run the button becomes Regenerate.
Who can generate AI feedback
As the instructor, you can generate AI feedback on any student's essay, as many times as you like. A student can generate it only on their own essay, and only 3 times per essay. Peer reviewers cannot generate AI feedback on a classmate's essay at all — it is only ever available to the instructor and to the essay's own author.
Because students are limited to 3 attempts, encourage them to draft substantially before generating; running it on an early draft spends an attempt on feedback that will soon be obsolete. The counter above the button shows how many attempts remain.
Using the Learning Outcomes dashboard
Once you start assessing students and saving rubric feedback, Rumi automatically builds a Learning Outcomes dashboard from that data to help you see how your class is doing and where to focus your teaching. You can access it from the Learning Outcomes tab on the Rubric and Outcomes page. Nothing extra is required to set it up — it is built from the rubric assessments you have already saved.
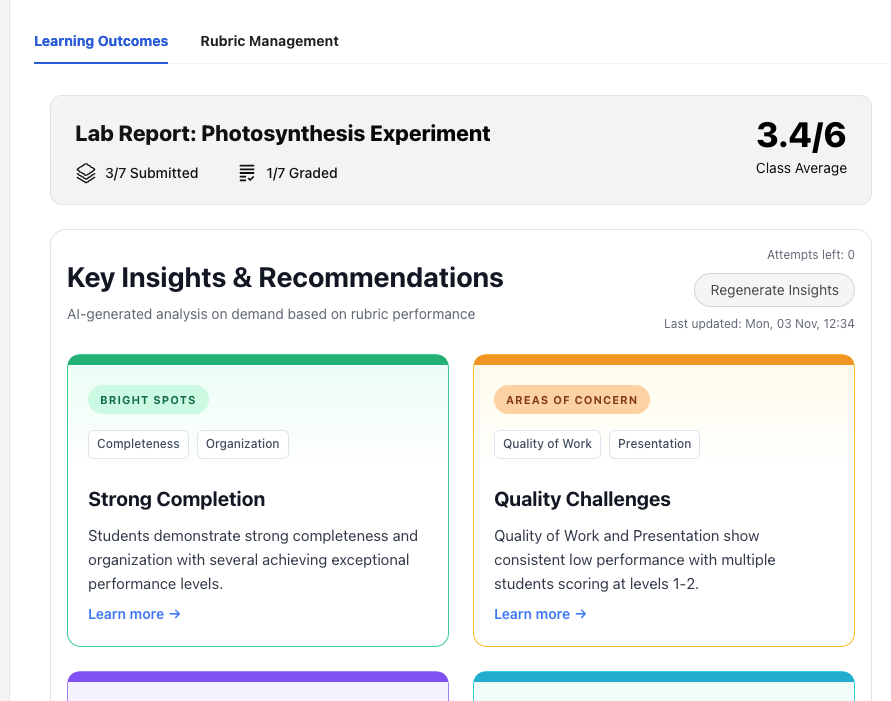
The dashboard includes four sections.
Key Insights & Recommendations
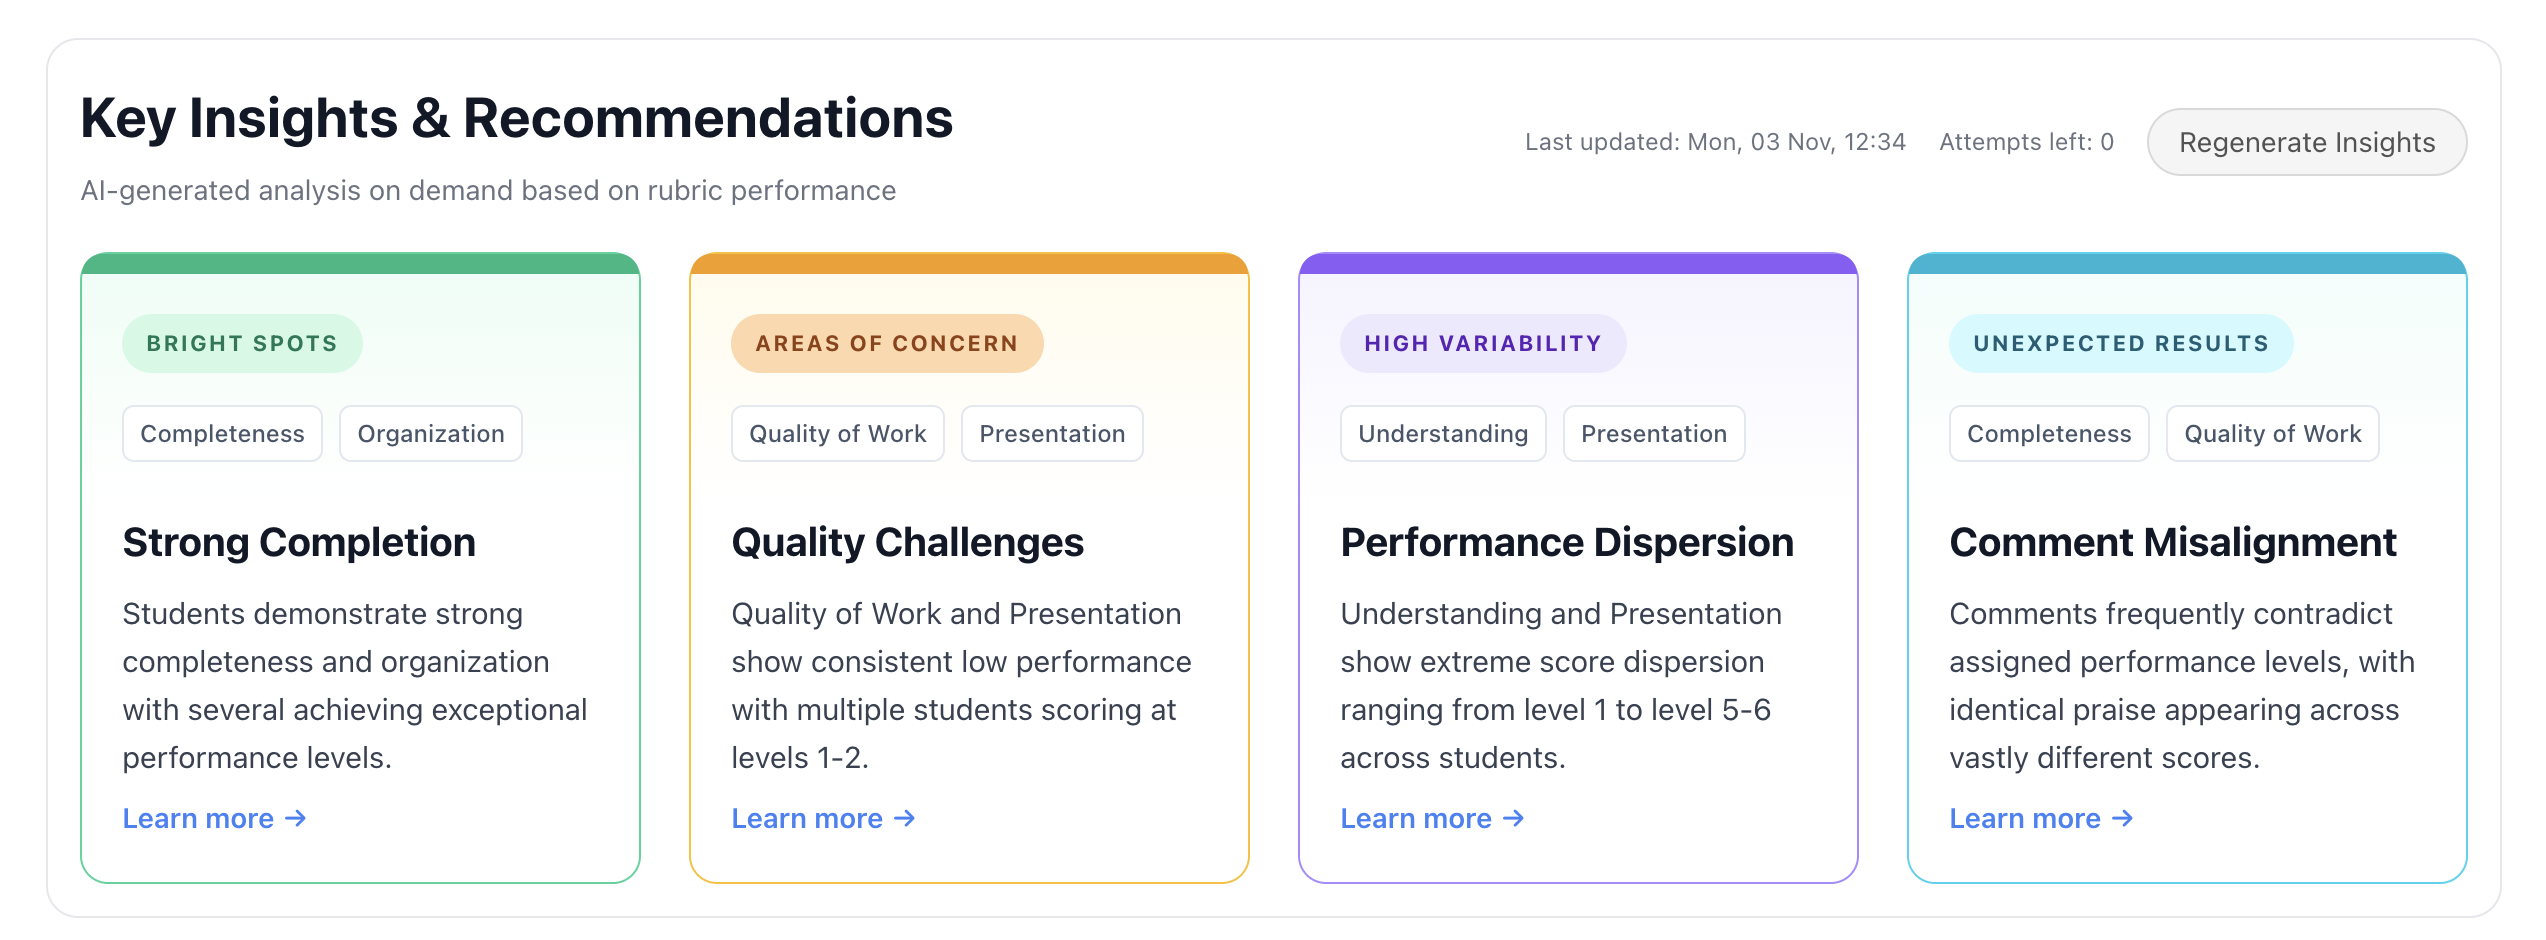
uses AI to analyze your rubric levels and comments, grouping findings into Bright Spots (areas where students are consistently strong), Areas of Concern (criteria where students are struggling), High Variability (criteria where performance varies widely), and Unexpected Results (patterns that stand out). Based on these patterns, Rumi suggests concrete next steps. This section requires feedback on at least three submitted assignments before it can generate insights.
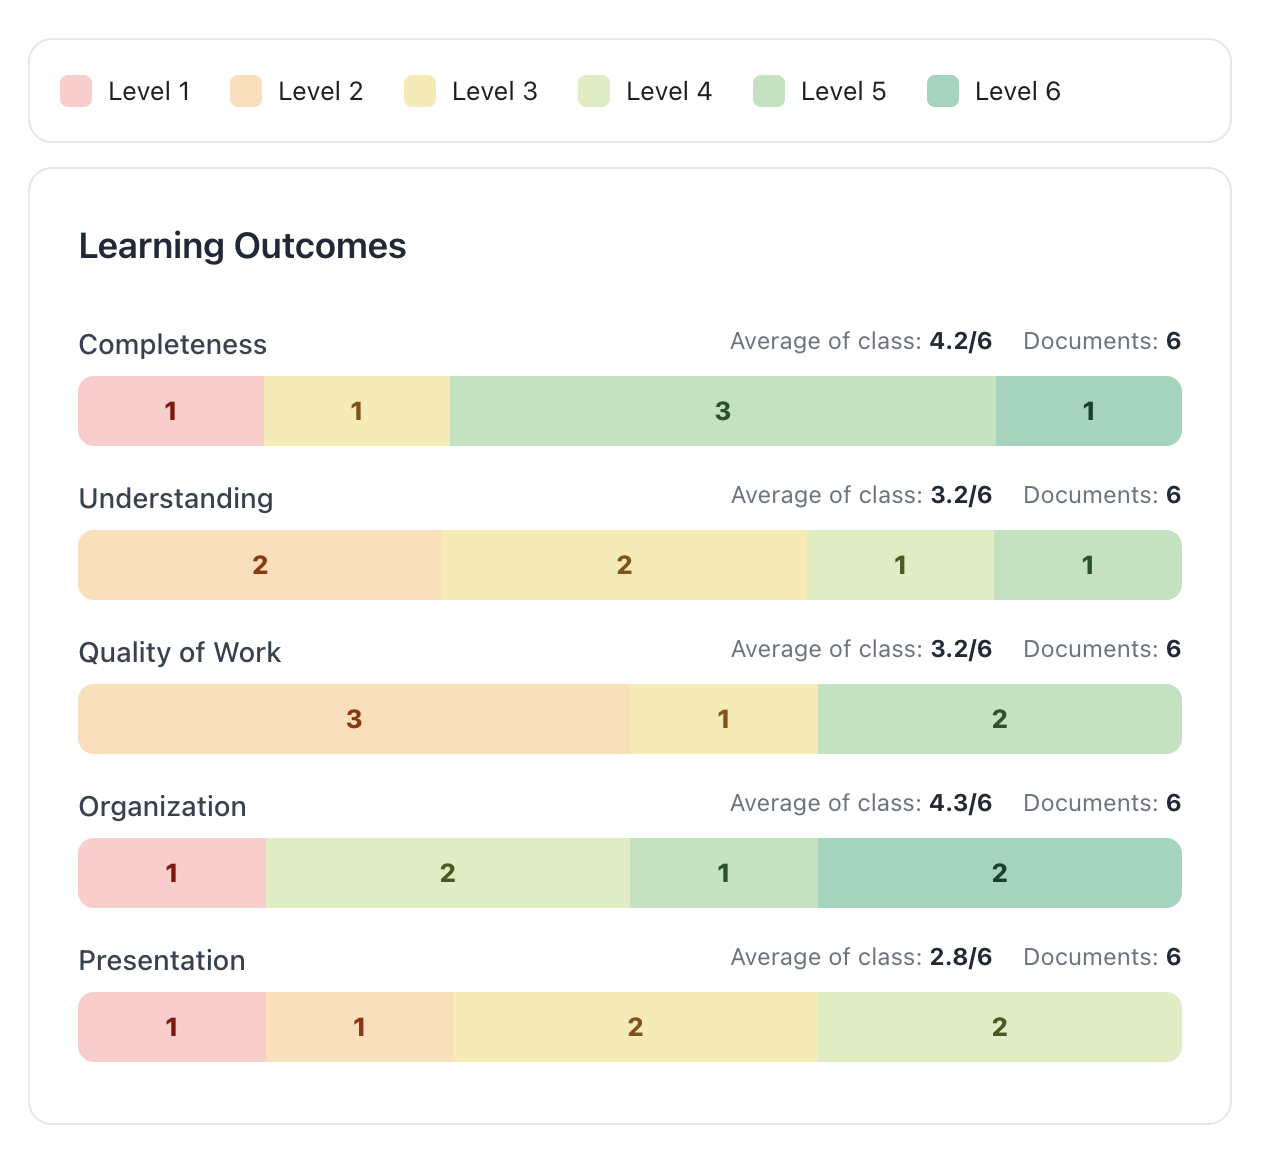
Learning Outcomes overview
visualizes how the class is performing on each rubric criterion — how many students fall into each performance level, and the class average for each criterion. This is a quick way to spot common strengths and shared challenges.
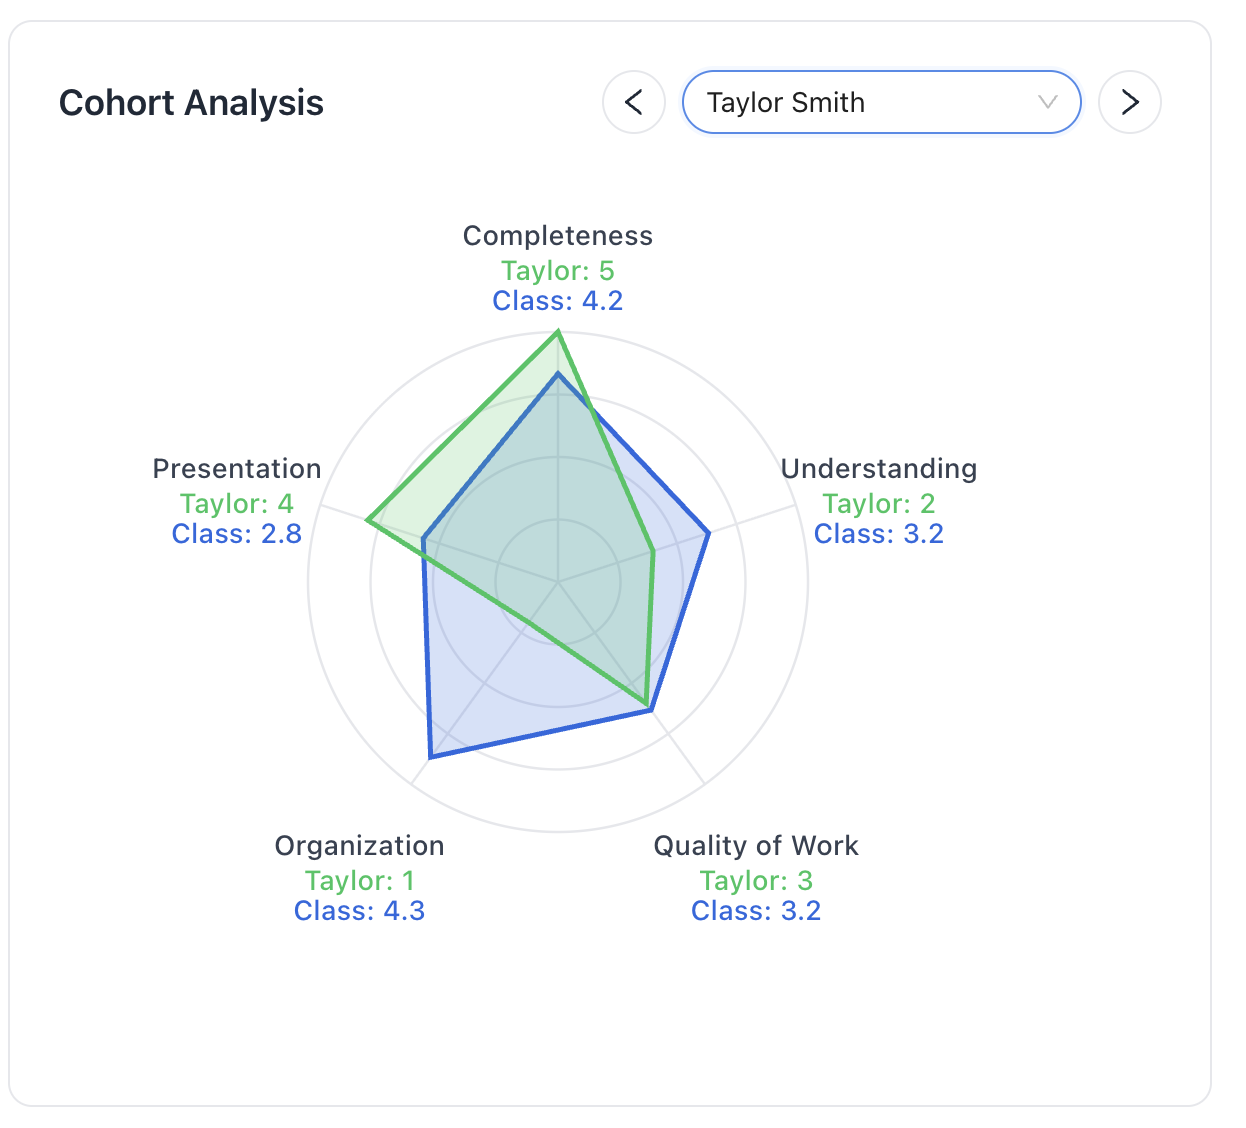
Cohort Analysis
lets you zoom in on individual students and compare their performance to the class average for every criterion, so you can see where a student is falling behind the cohort and where they are performing above it.
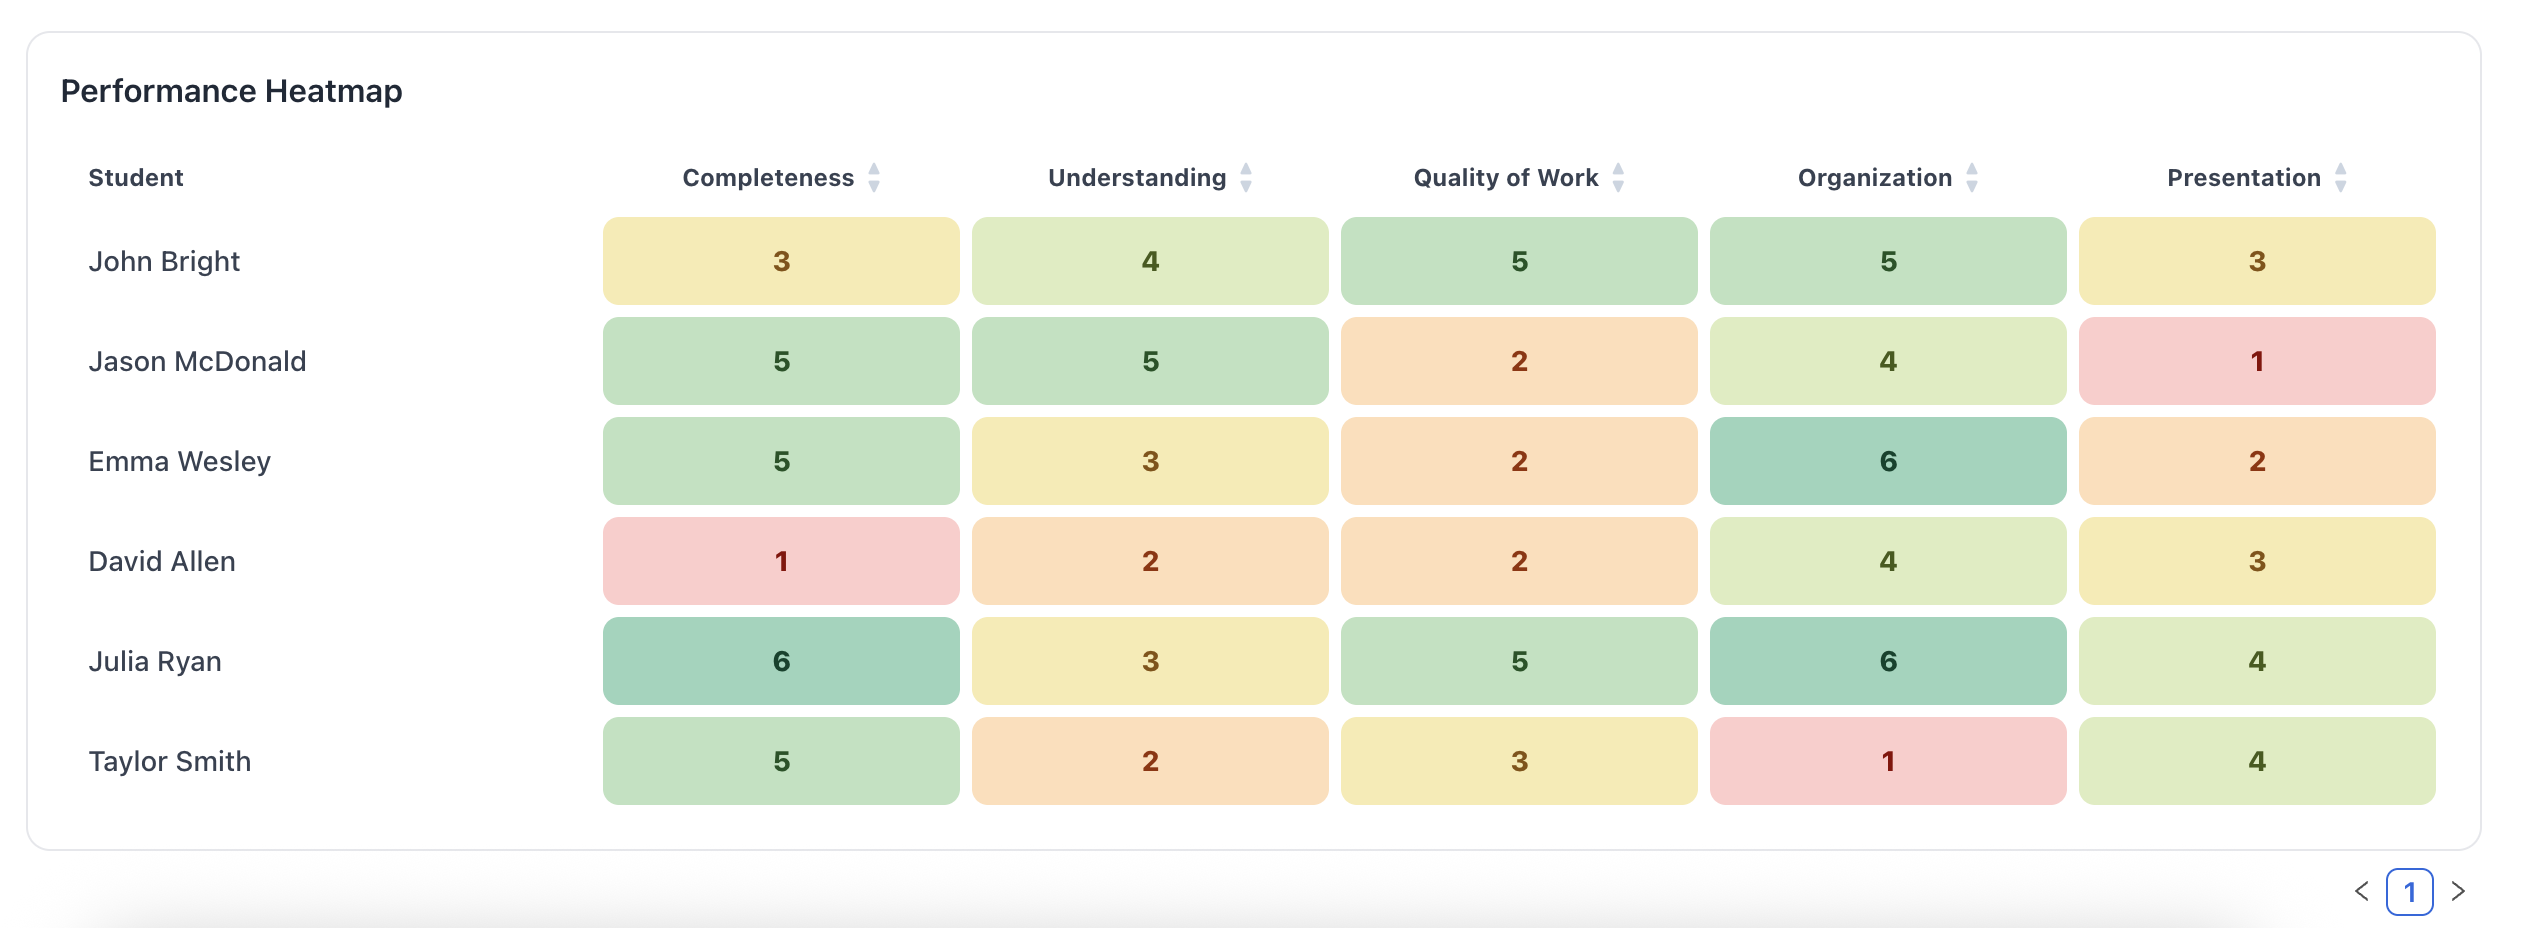
Performance Heat Map
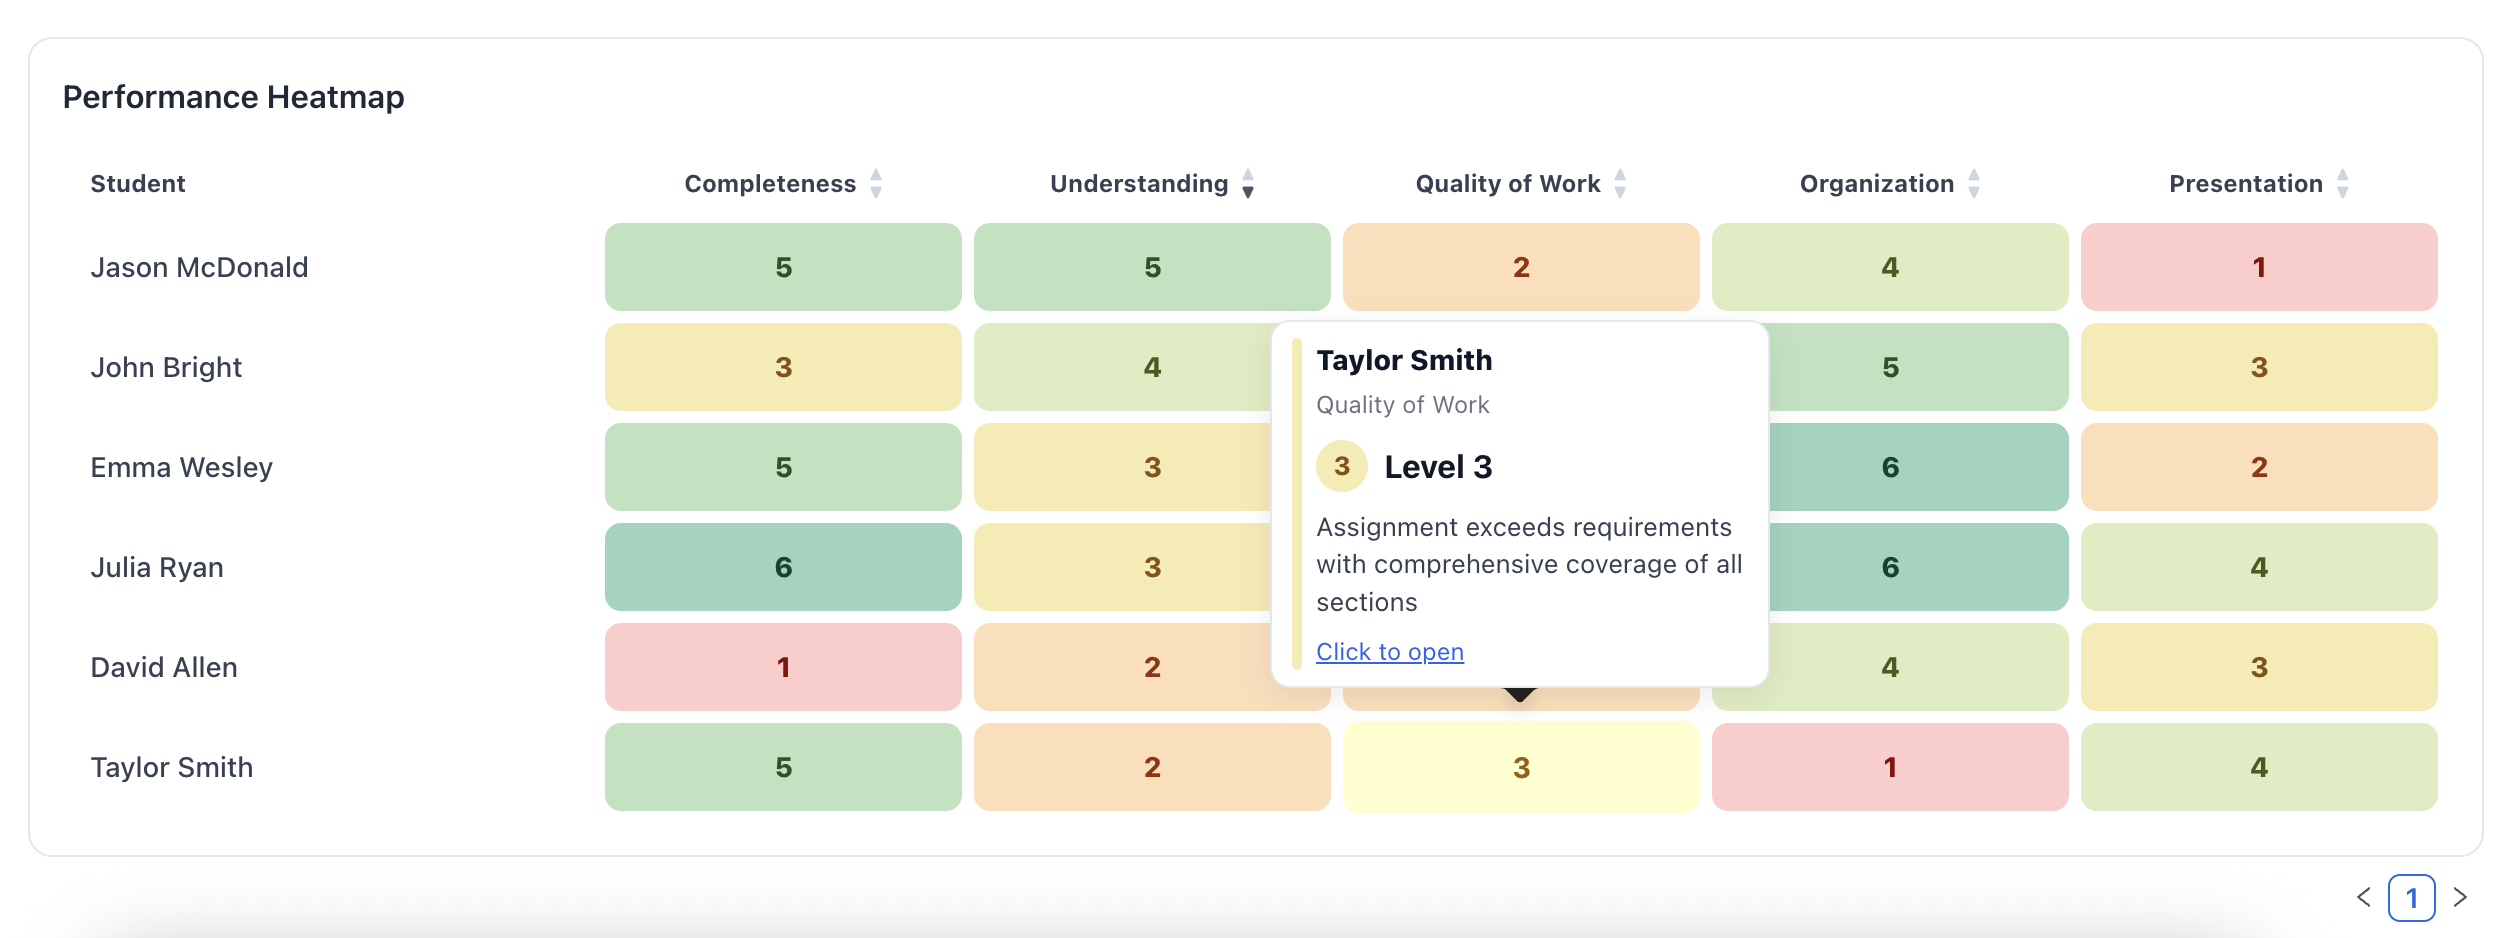
gives you a compact, color-coded overview of performance across all criteria. Sort columns to identify criteria where most students are doing well and those where performance is mixed. Hover over a cell to preview the comment you left for that student and criterion, and click Click to open to view the full feedback.
With Learning Outcomes, you can guide students toward clear goals, provide richer feedback aligned to your rubric, and use data to make more informed decisions about what to teach next.